¶ VMs
Info: Virtual Machines is in beta. Everyone can use it, and every VM it makes is a real computer on your server. Beta means we are still finishing it, so screens may change and you may find a rough edge. Read the known issues before you rely on a VM. What beta means
A VM (virtual machine) is a complete computer that runs inside your HexOS server. It has its own operating system, storage, and memory, and it shares your server's hardware. You can run Windows for a program that needs it, a Linux desktop, or a small appliance system such as Home Assistant OS, without buying another machine.
HexOS does most of the work. Choose a system from the catalog, and HexOS creates the disk, installs the operating system, installs the apps you picked, and tells you when the VM is ready.
¶ What beta means
Virtual Machines is an open beta. It is on for everyone, with no sign-up. The VMs screens show a Beta badge. Click it to read a short note about the beta.
The Beta badge's note
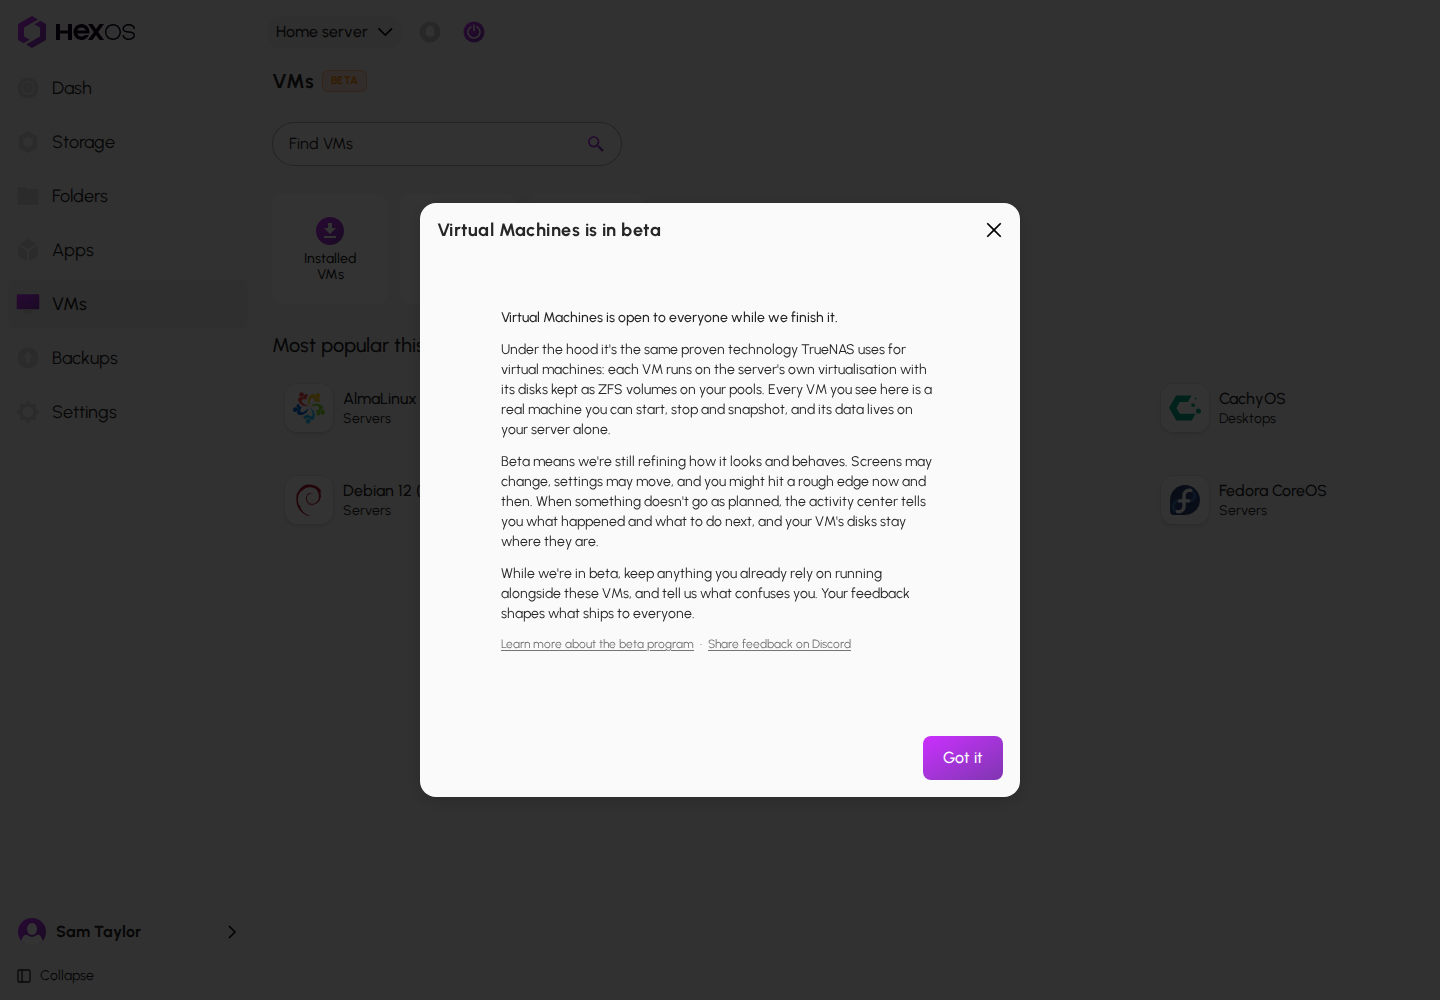
What this means for you:
- Your VMs are real. Each VM runs on the same virtualization that TrueNAS uses, and its disks are stored on your own pools.
- We are still finishing it. Screens may change, settings may move, and you may find a rough edge now and then.
- You are told when something goes wrong. The activity center says what happened and what to do next.
- Keep what you rely on. While Virtual Machines is in beta, keep anything you already depend on running alongside your VMs.
- Tell us what confuses you. Your feedback shapes the finished version. Share it in the HexOS Discord Community.
VM setup, where HexOS finishes setting up some systems after they start, is part of the same beta.
¶ Known issues
We know about these and are working on fixes. This list changes as fixes ship.
- The Power menu does not ask first. Reboot, Shut down and Force off act as soon as you click them. Shut down and Reboot turn the VM off if it has not shut down in time. Meanwhile, save your work inside the VM first, or use the power button in the console, which asks before each action.
- A Reboot that cannot start the VM again says nothing. The VM stays off. Meanwhile, after a Reboot, check that Status reads Running. If it does not, click Power on.
- Resize lets a disk grow past the free space on its pool. Meanwhile, check the free space on the Storage screen before you make a disk larger. A full pool stops VMs and apps from saving anything.
- Resize on a running VM says the change waits for the next start. The disk usually grows straight away. Meanwhile, extend the partition inside the VM right away. If the extra space does not show, restart the VM.
- An ISO in a folder inside Install Media is refused. You can pick it, but HexOS says Choose an ISO file from Install Media. Meanwhile, put ISO files directly in the Install Media folder, not in a folder inside it.
- Add disk calls its size "OS install disk size". It is the size of the new disk.
- SteamOS says its built-in account is called "core". It is called deck. Meanwhile, sign in to SteamOS as deck with the password you chose.
- A custom VM started from a download link cannot be cancelled. Meanwhile, wait for it to finish or fail, then uninstall it.
- HexOS has no snapshot choice right now. New VMs get no daily snapshots. Systems from the catalog get one snapshot of the fresh install. Meanwhile, take and restore snapshots in TrueNAS. See Storage and snapshots.
- The Plex Media Server page does not say which folders it can read. The VM gets read access to your Media, Movies, Shows, Music, Photos and Videos folders, but only the Review step says so. Meanwhile, read the Review step before you click Create VM. See Plex Media Server VM.
- A server offline for a long time hides VMs on its own deck. See When your server is offline.
- VM setup: a step that failed reads "Skipped". It looks the same as a step you skipped. See VM setup known issues.
- VM setup: Run setup on a Plex VM can do nothing. If Sign in to Plex was off when you installed it, there is nothing for Run setup to do, and you cannot turn the sign-in on later. See VM setup known issues.
- VM setup: Retry on the media scan row always fails. See VM setup known issues.
- VM setup: there is no way to switch setup off for a VM. See VM setup known issues.
- VM setup stops if the VM's network address changed. See VM setup known issues.
¶ The VMs screen
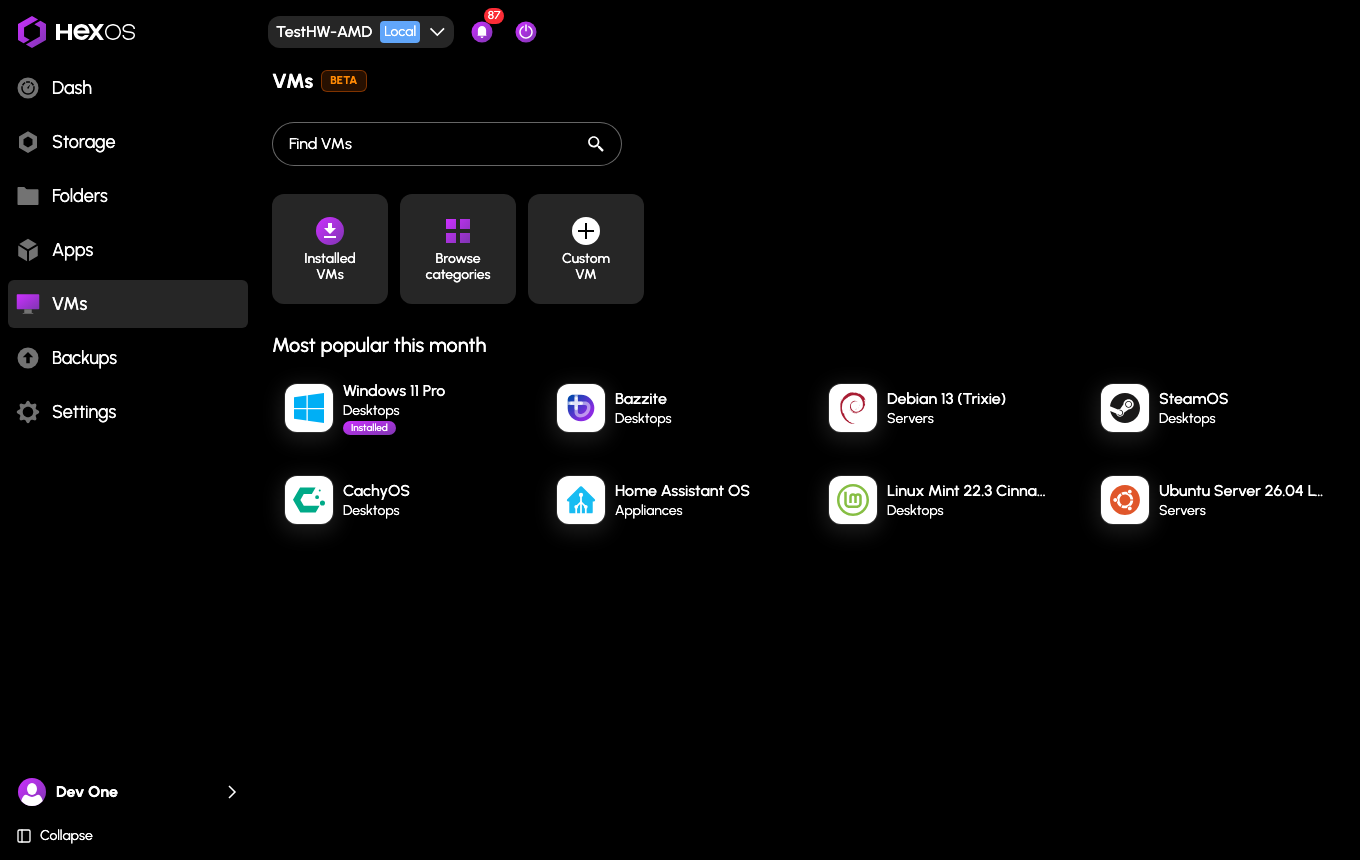
Go to VMs in the menu. From here you can:
- search with Find VMs
- open Installed VMs to see the VMs you already have
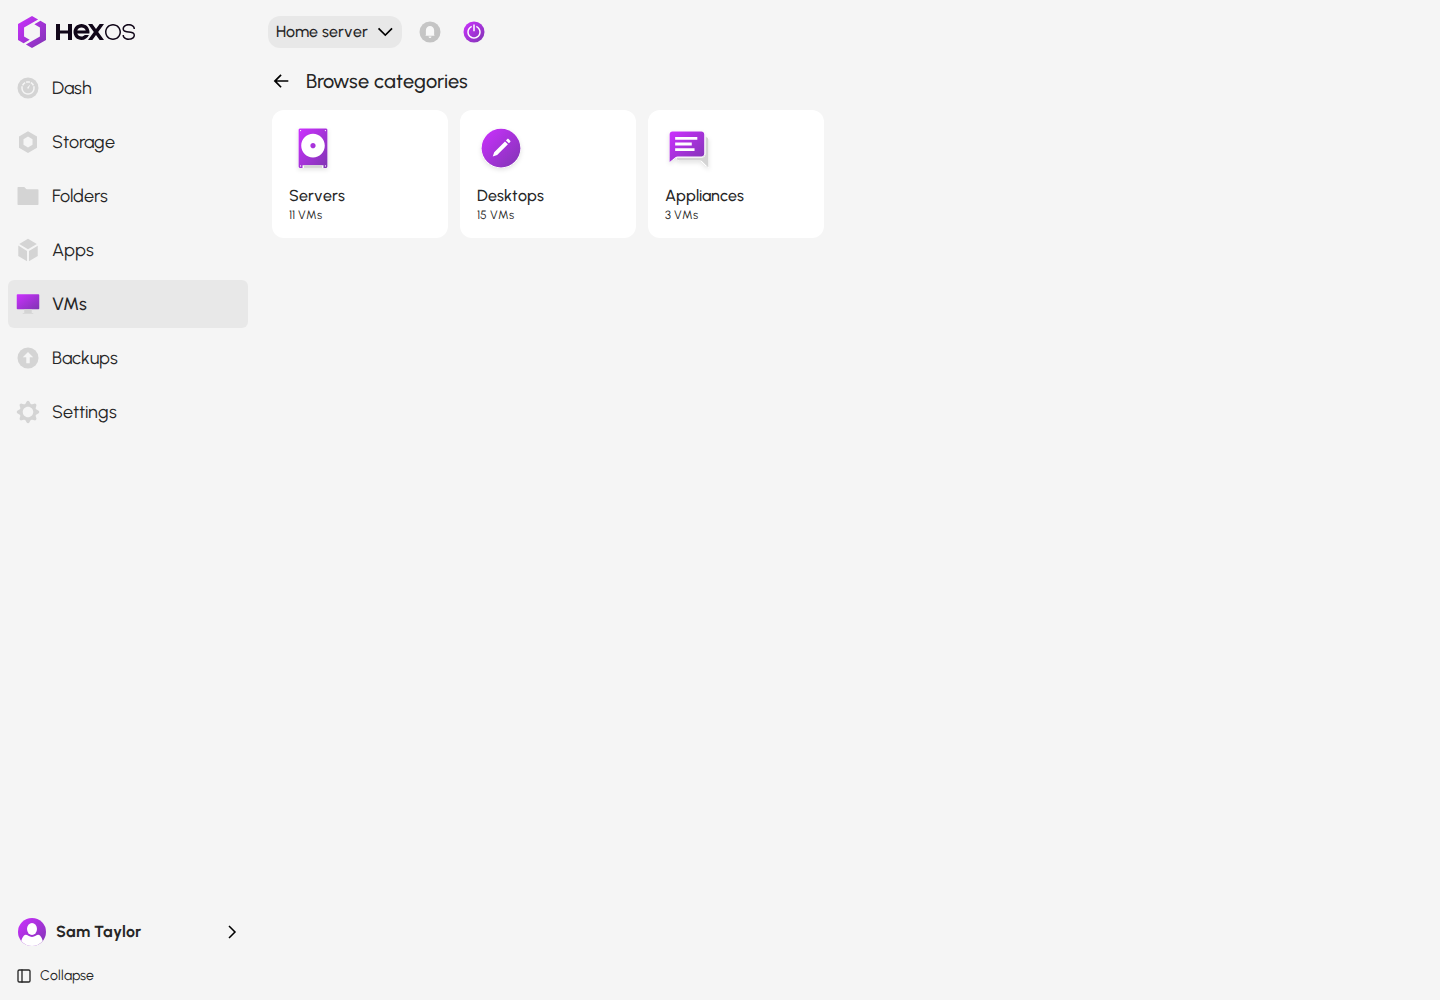
- open Browse categories to look through Servers, Desktops, and Appliances
- start a Custom VM to install an operating system yourself
- pick from Most popular this month
The VMs screen
Browse categories
Searching replaces the page with the systems that match. The catalog leaves out systems your server cannot run, because of its TrueNAS version, its processor, or its version of HexOS.
If nothing is left, the screen says No VMs are available for this server yet. When your TrueNAS version is the reason, it also says which version VMs need and which one your server has.
¶ What your server needs
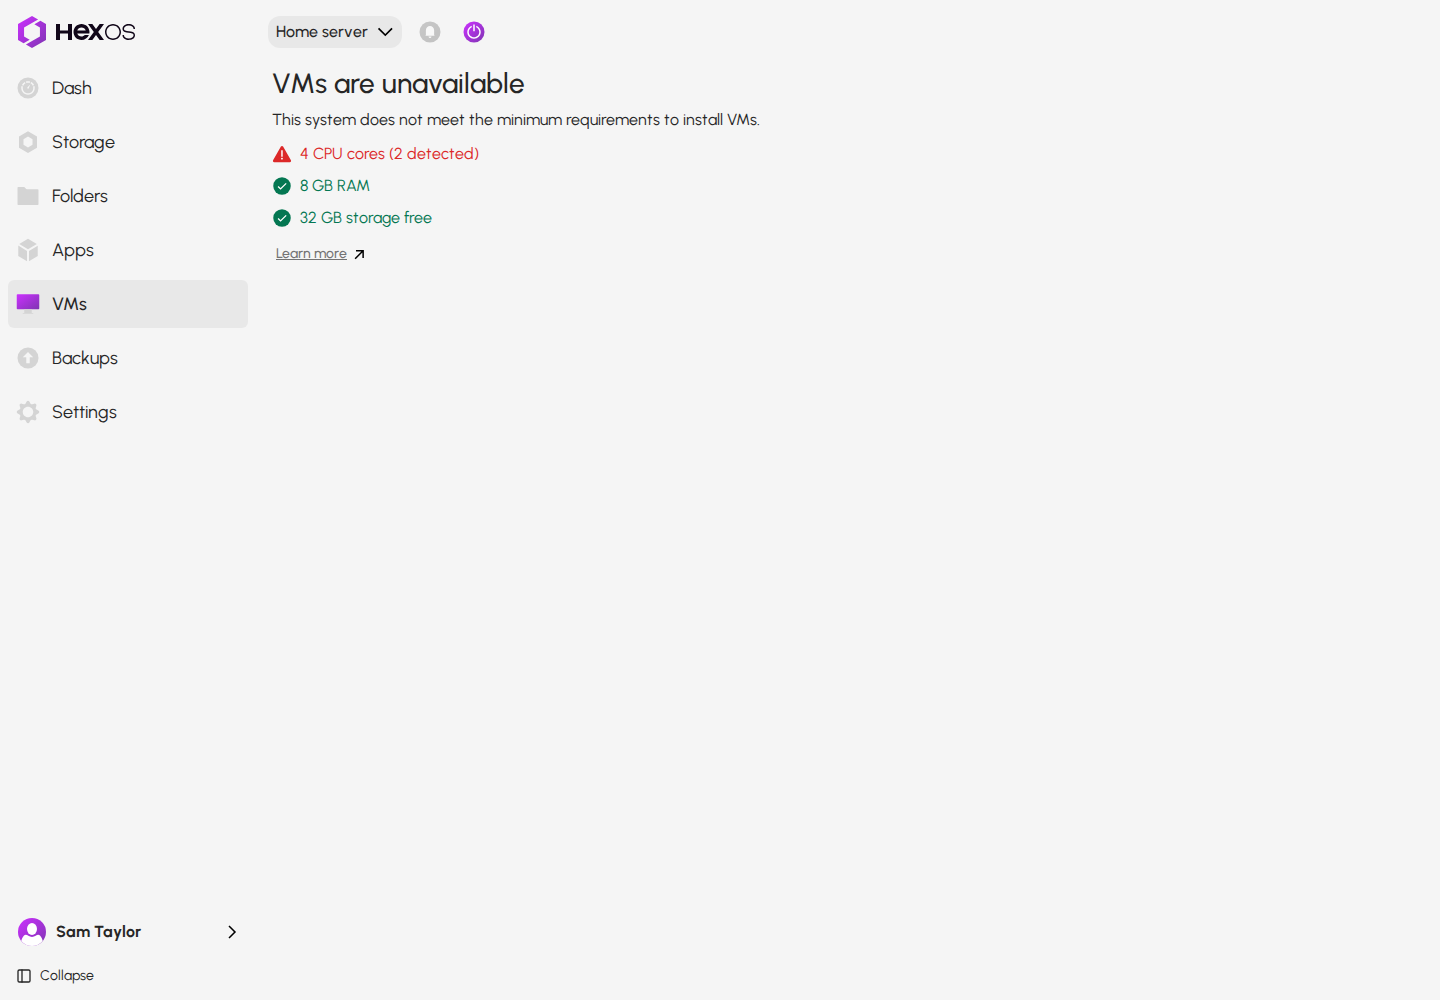
To show VMs at all, your server needs:
- 4 processor cores
- 8 GB of memory
- 32 GB of free space on the pool with the most free space
If any of these is short, the VMs screen says VMs are unavailable and lists all three, with the one that is short marked.
VMs are unavailable
When you set up a VM:
- Processor cores: HexOS keeps 2 cores for itself, and the rest are available to VMs.
- Memory: HexOS keeps a quarter of your server's memory for itself, and never less than 4 GB. The sliders show what is left as you choose.
- Storage: each VM needs room for its disks. While a system installs, its installer is also stored on the pool for a while, so the pool needs room for that too.
Some systems in the catalog also need particular processor features or a newer TrueNAS. HexOS leaves out anything your server cannot run. Hardware virtualization (Intel VT-x or AMD-V) must be turned on in your server's BIOS.
If HexOS itself runs as a virtual machine on Proxmox, a few Proxmox settings make VMs run up to twice as fast. See Running HexOS on Proxmox.
¶ Set up a VM from the catalog
- Go to VMs.
- Click the system you want. Its page shows a description, screenshots, and three tabs:
- Requirements: the processor cores, memory, and storage it needs
- Locations: which of your storage locations it uses, Virtual Disks and sometimes Install Media
- Permissions: what it is allowed to access
- Click Install.
- Work through the setup dialog. Click Continue after each step.
- On the Review step, click Create VM.
A system's page in the catalog
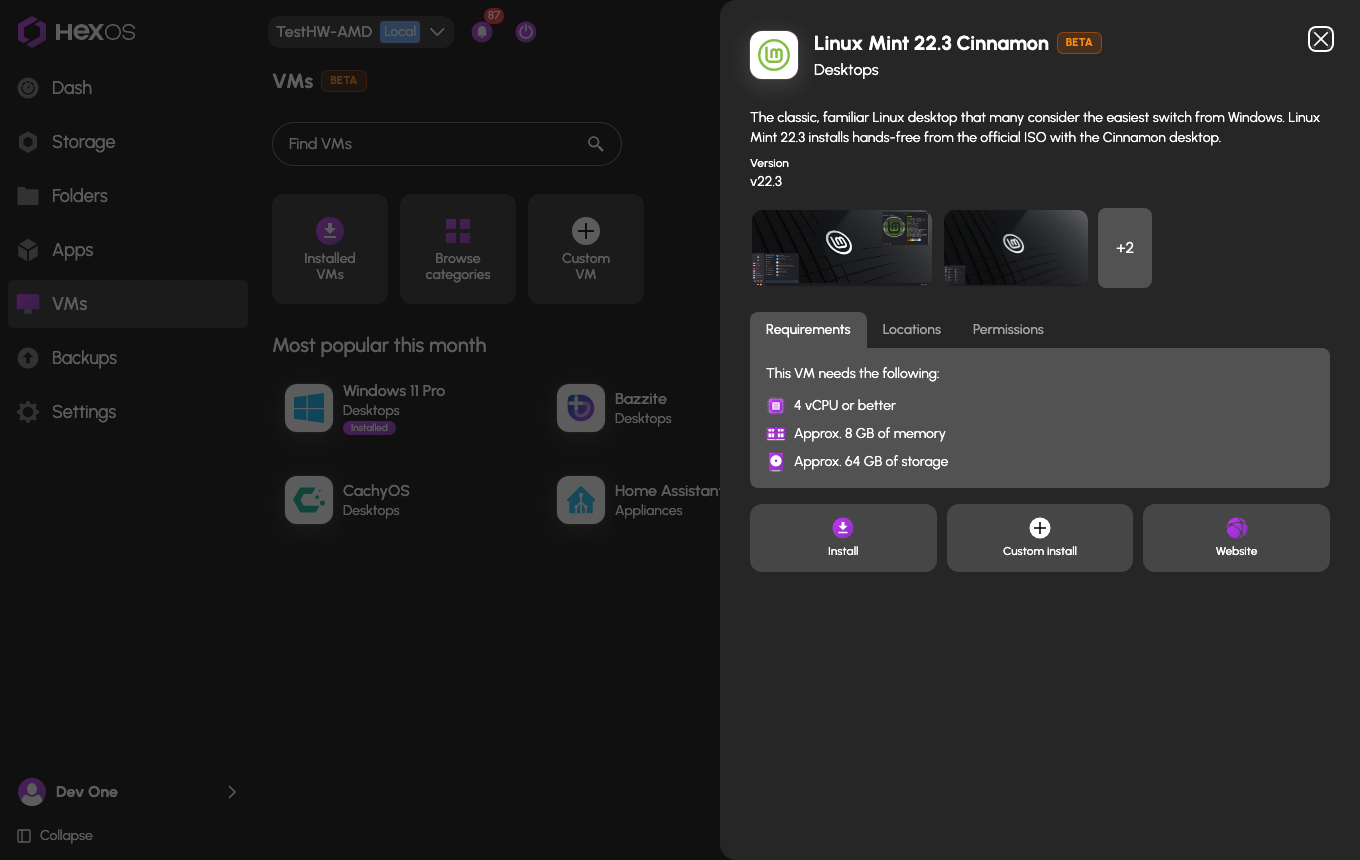
HexOS says Setting up and the VM's name, and you can follow the progress in the activity center. See While it is being set up.
Custom install, on the same page, runs the same automated setup but first asks how you will access the VM. Choose it to hand a graphics card to the VM. See Passthrough requirements. Website opens the system's own site.
Info: Hardware checks do not lock the pool that holds your virtual disks. You can create a VM while a drive check runs, but a memory test restarts the whole server and makes it unavailable until the test ends. See New server checklist.
If the system is already installed, its page shows that VM's controls instead of Install. If it is installed more than once, the page asks which one you want to manage. With Expert Mode on, a New button sets up another copy.
¶ The setup steps
Which steps appear depends on the system you chose.
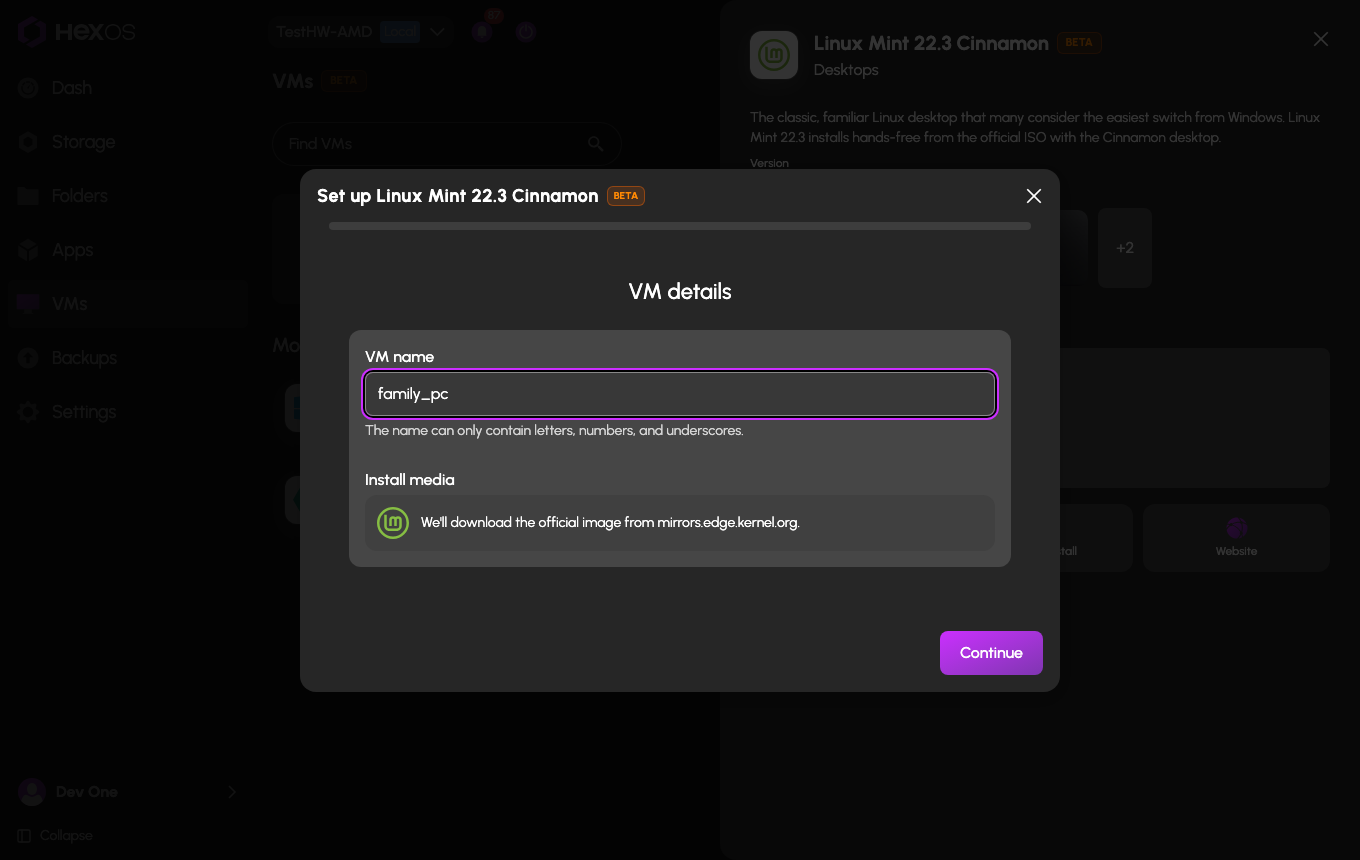
VM details. Give the VM a name. The name can only contain letters, numbers, and underscores. Under Install media, most systems say We'll download the official image and need nothing from you. Windows needs an installer ISO:
- Choose Select an ISO file, then pick one from the Choose an ISO list. Browse files… in that list opens your Install Media folder, where you can upload one from your computer.
- Or choose Provide a download link from Microsoft and paste the link. Open the official ISO download page, shown under that choice, takes you to the page that makes one.
VM details
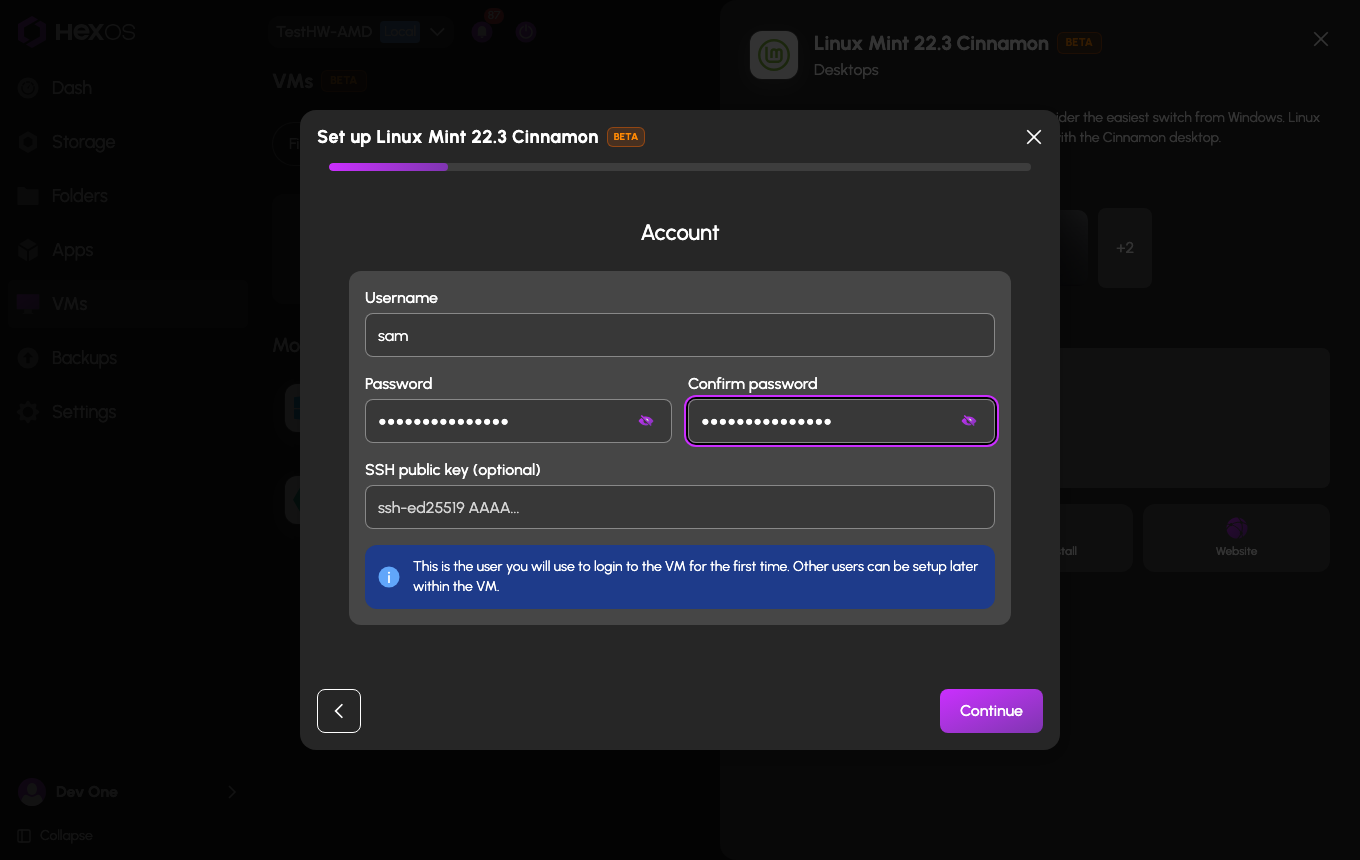
Account. The Username and Password you will sign in to the VM with for the first time, and Confirm password. Passwords need at least 8 characters. Linux systems also take an SSH public key (optional). On Linux servers it can replace the password. You can add more users later from inside the VM. A few systems come with a built-in account, so they ask for a password but no username. Appliances skip this step.
Account
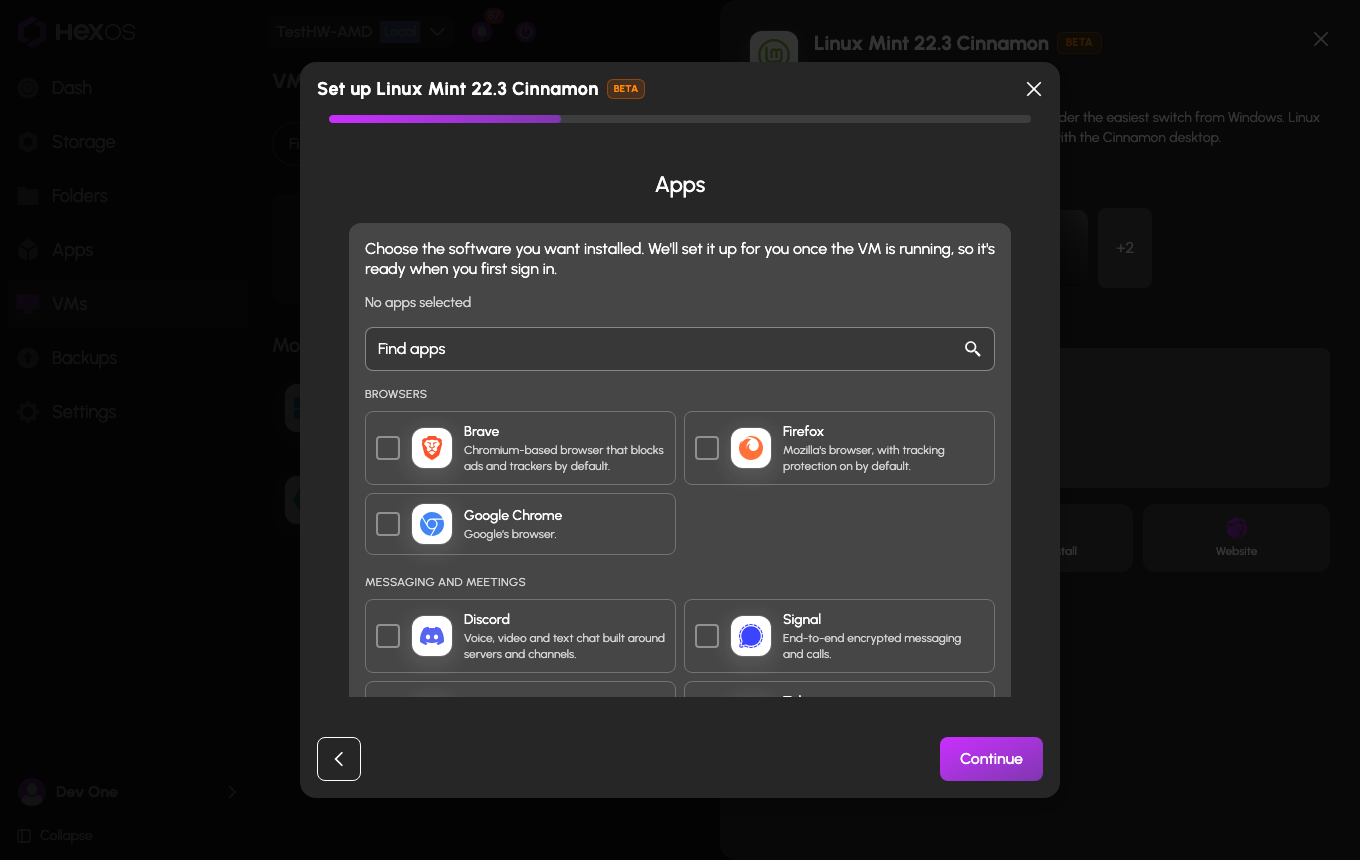
Apps. Windows and Linux desktop systems let you choose software to have installed for you, such as a browser, chat apps, media tools, or Steam. Use Find apps to search. HexOS installs your choices once the VM is running, so they are ready when you first sign in. The step shows roughly how much disk they need.
Apps
Setup. Only for systems that HexOS can finish setting up after they start, such as Plex Media Server and Home Assistant OS. Each switch is one thing HexOS may do for you. See VM setup.
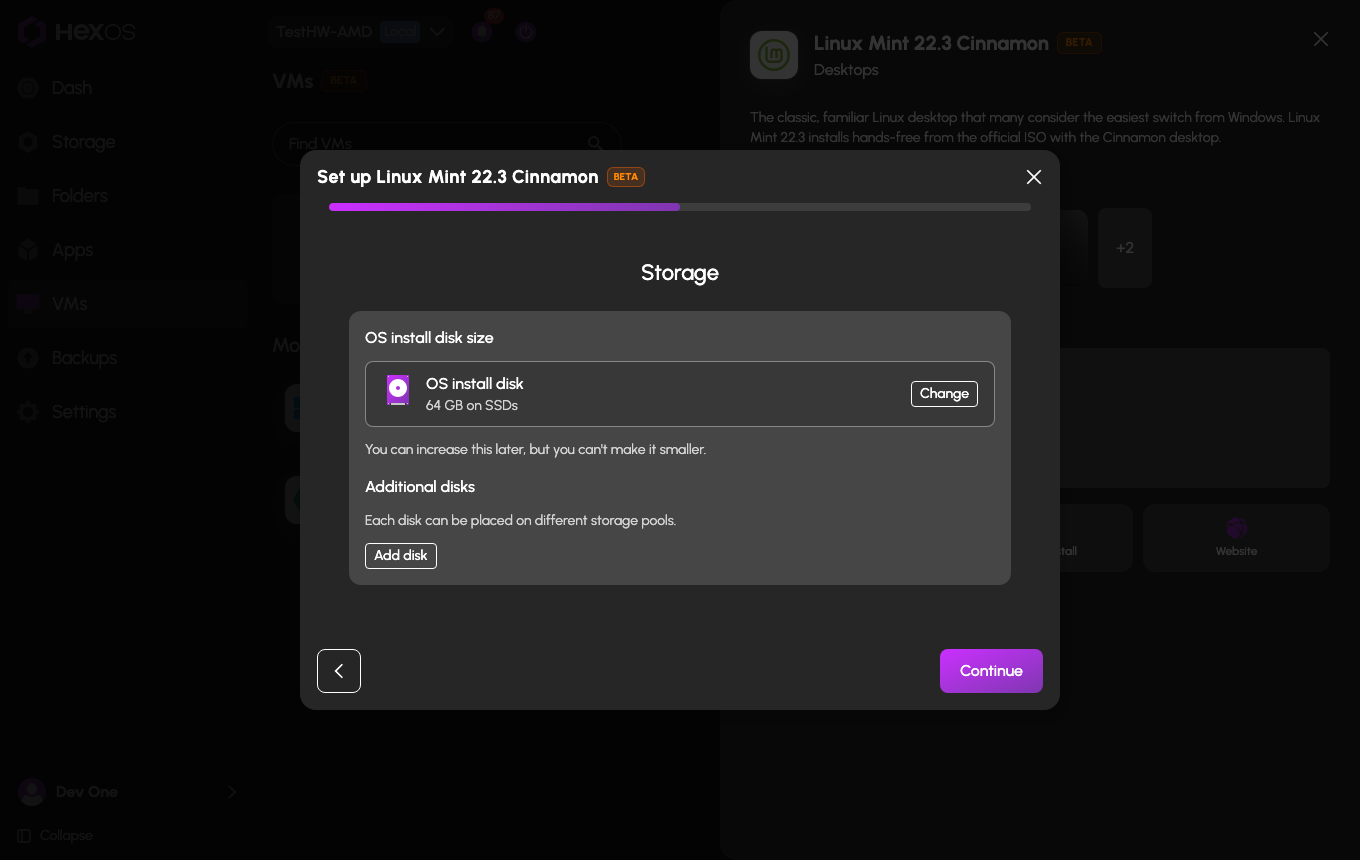
Storage. The size of the OS install disk and which pool it is on. Click Change to adjust it. You can make a disk larger later, but never smaller. Add disk gives the VM more disks, up to 8 in all, and each one can go on a different pool. If a pool does not have room for the disks on it, HexOS says so and you cannot continue until you change the size or the pool.
Storage
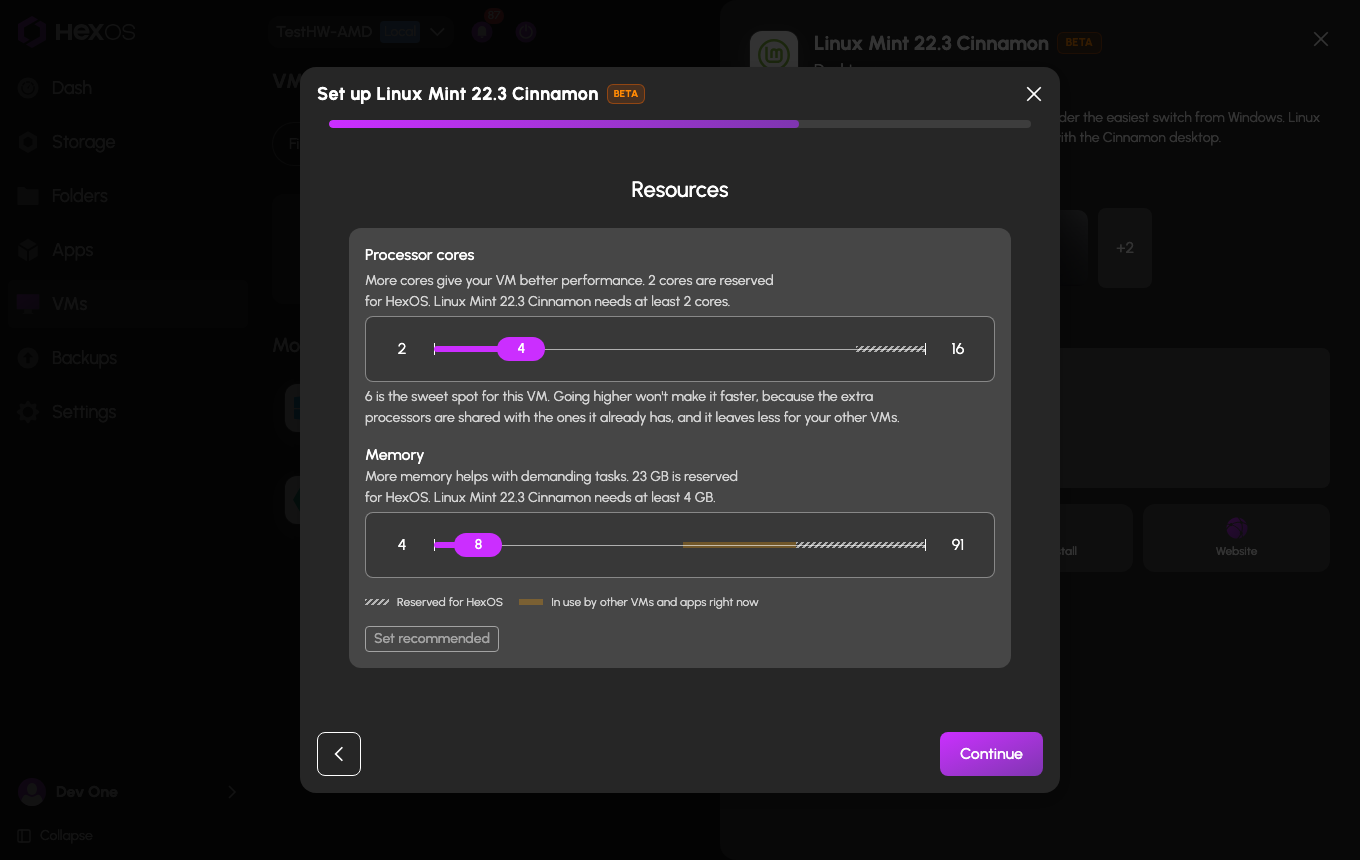
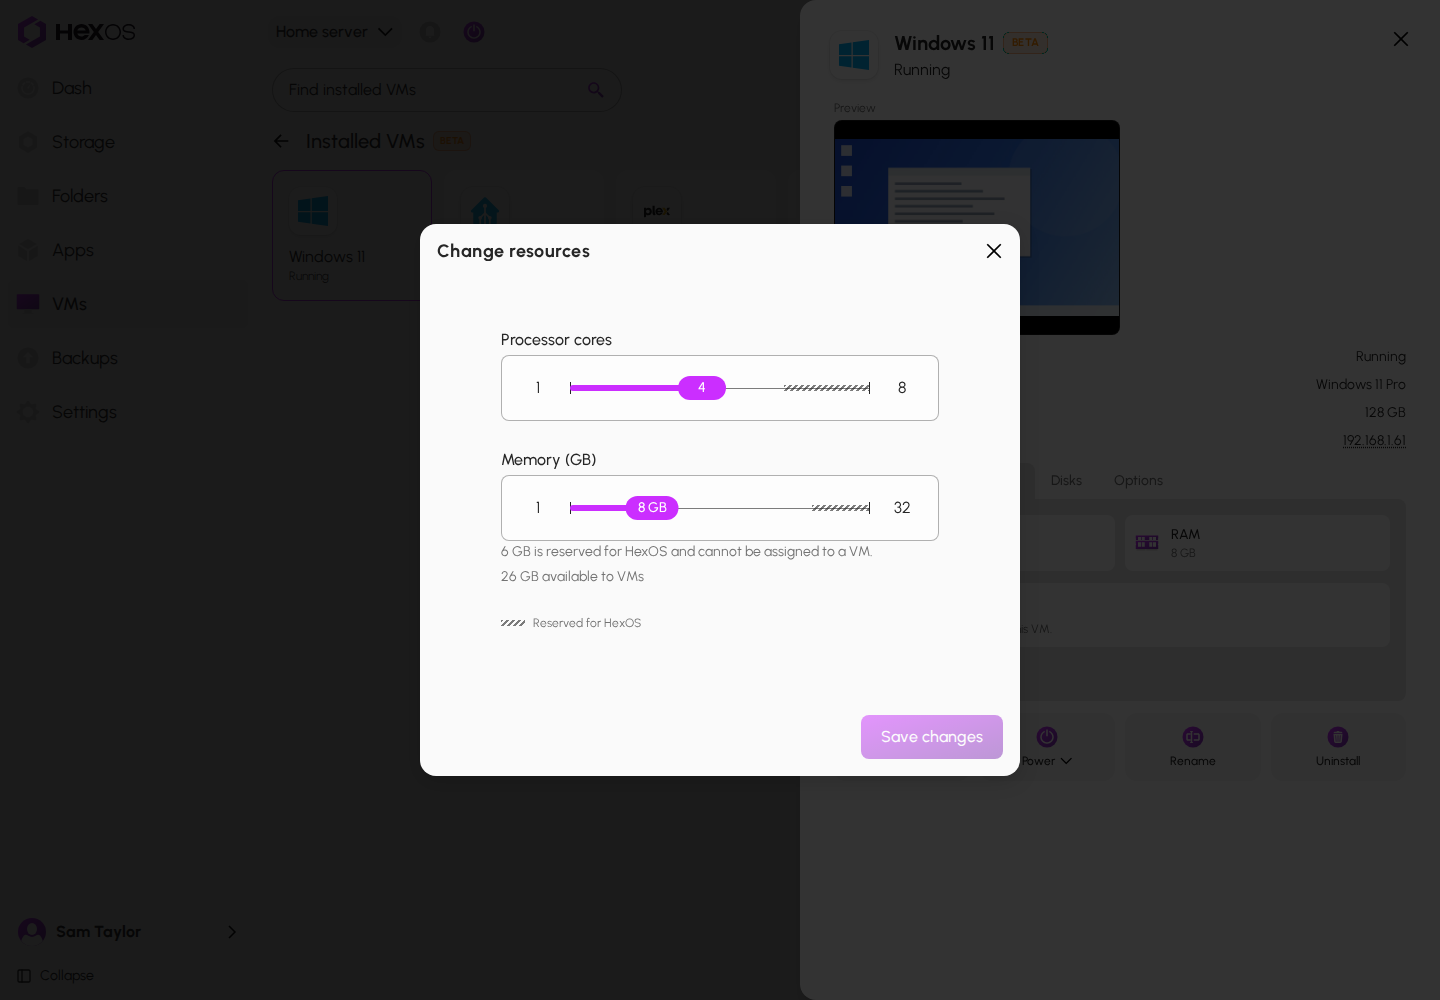
Resources. Sliders for Processor cores and Memory. The shaded part of each slider shows what is Reserved for HexOS. The Memory slider also shows what is In use by other VMs and apps right now. Each system has a minimum, and for processor cores HexOS points out the sweet spot: more cores than that will not make the VM faster. Set recommended puts both sliders back. If your server cannot spare what the system needs, the step says how much it needs and how much is free.
Resources
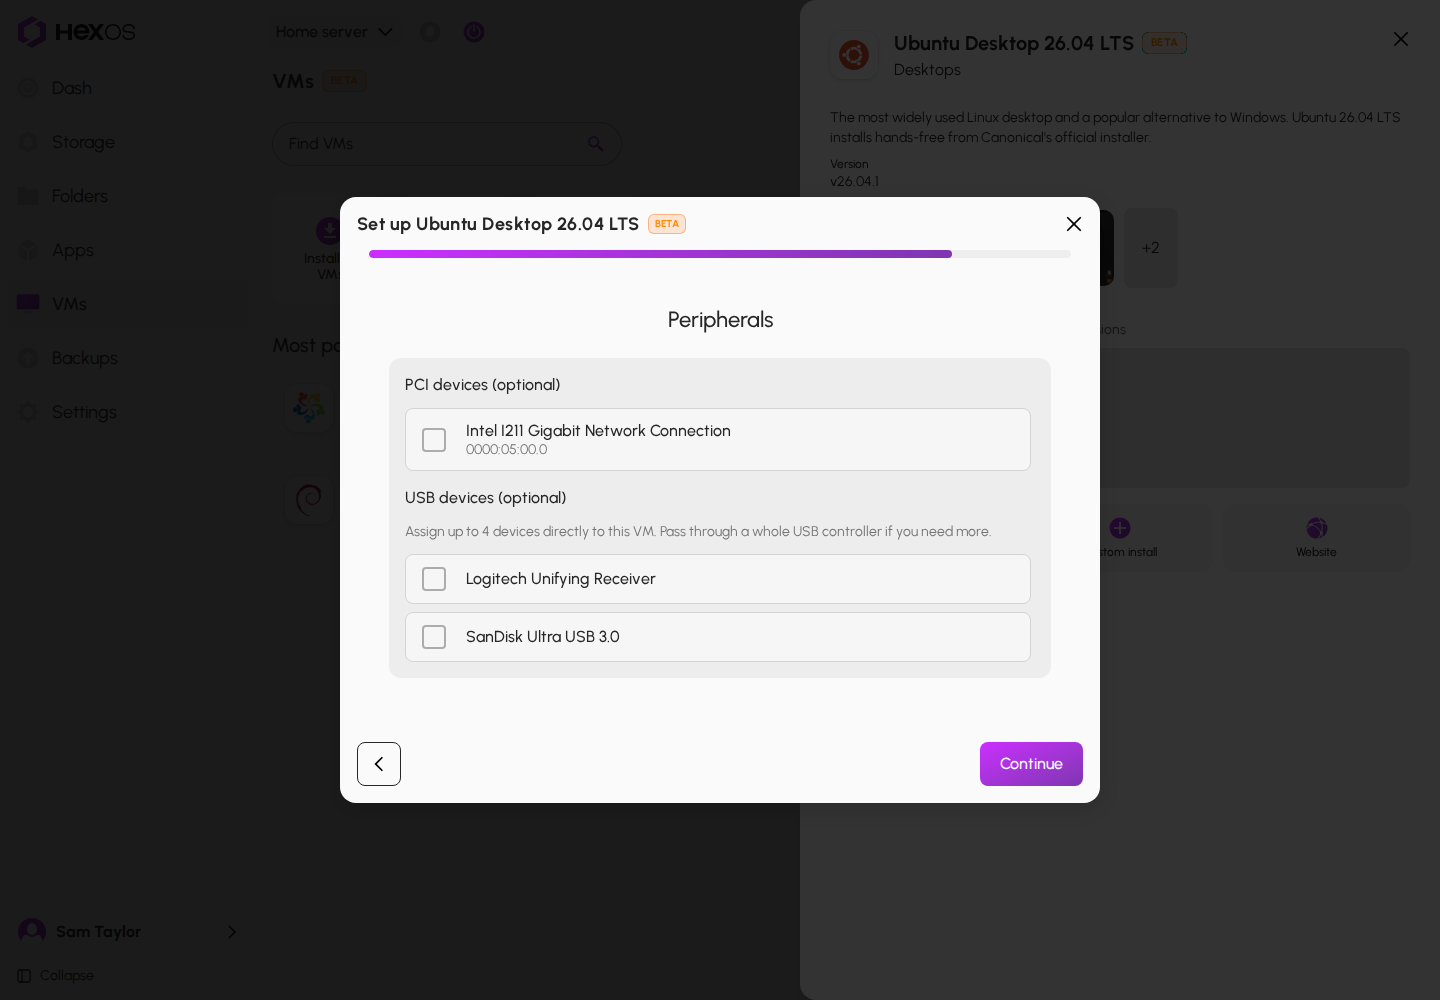
Peripherals. Optional. Hand PCI devices (optional) or USB devices (optional), such as a Zigbee stick, directly to the VM. You can pick up to 4 USB devices. Skip this step if you do not need it. See Passthrough requirements.
Peripherals
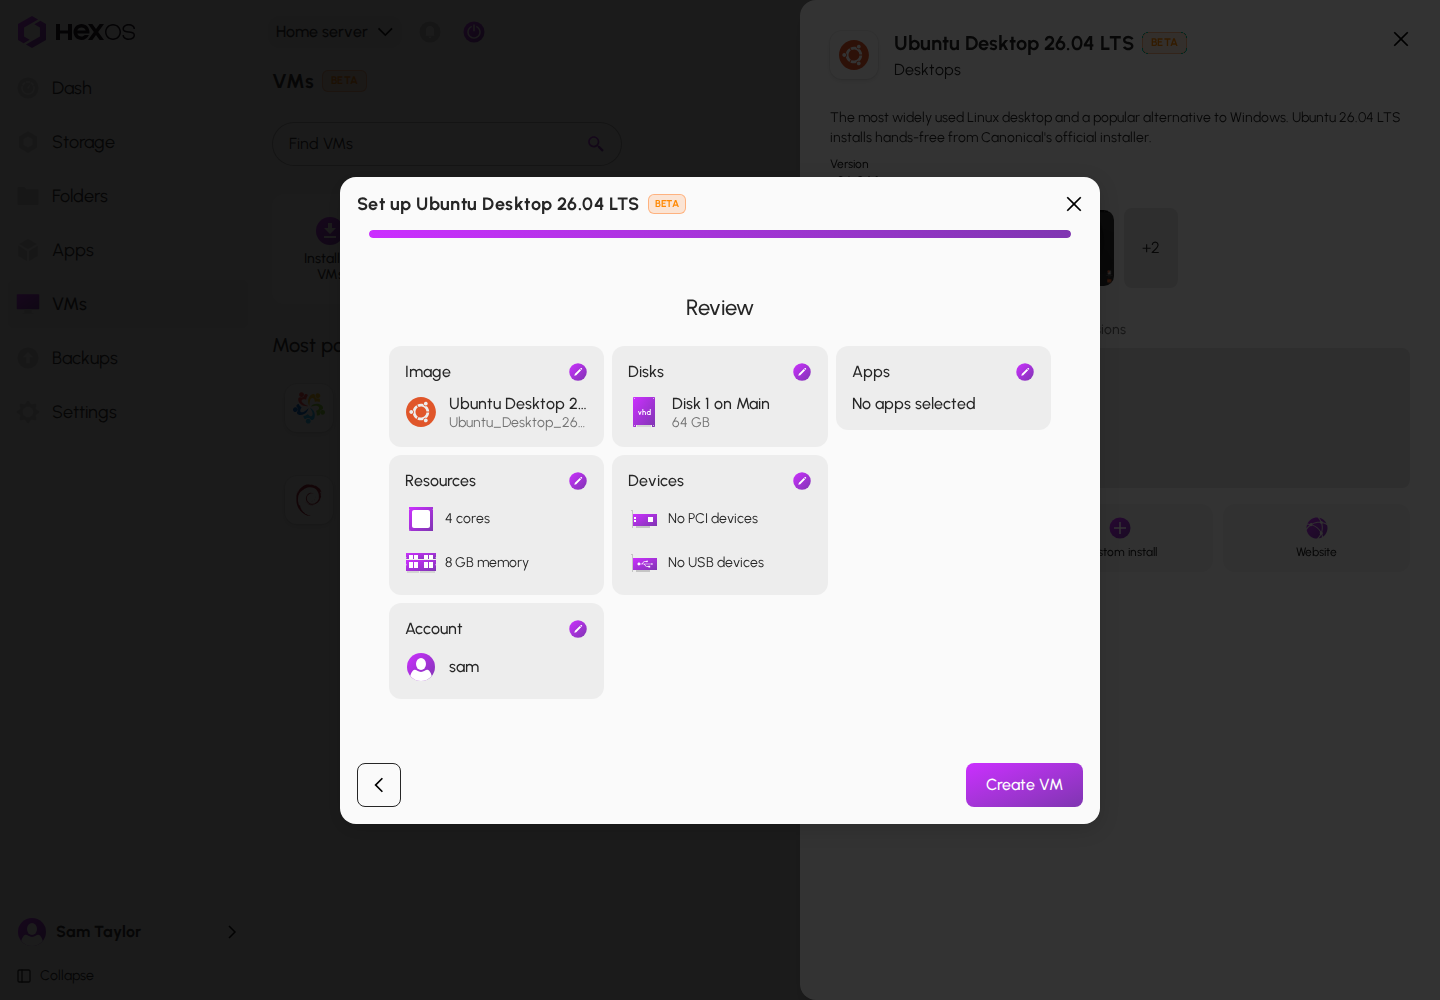
Review. Check each card, then click Create VM. The Devices card lists the hardware you picked. For a system that reads your folders, such as Plex Media Server, the Shared folders card says which folders the VM can read.
Review
Info: VMs can only boot ISOs stored in your Install Media folder. If you pick a file from somewhere else, HexOS says VMs can only boot ISOs stored in Install Media. Upload or copy the file there, then pick it.
¶ Building a custom VM
To install an operating system yourself, click Custom VM on the VMs screen, or Add VM > Create custom VM on the Installed VMs screen.
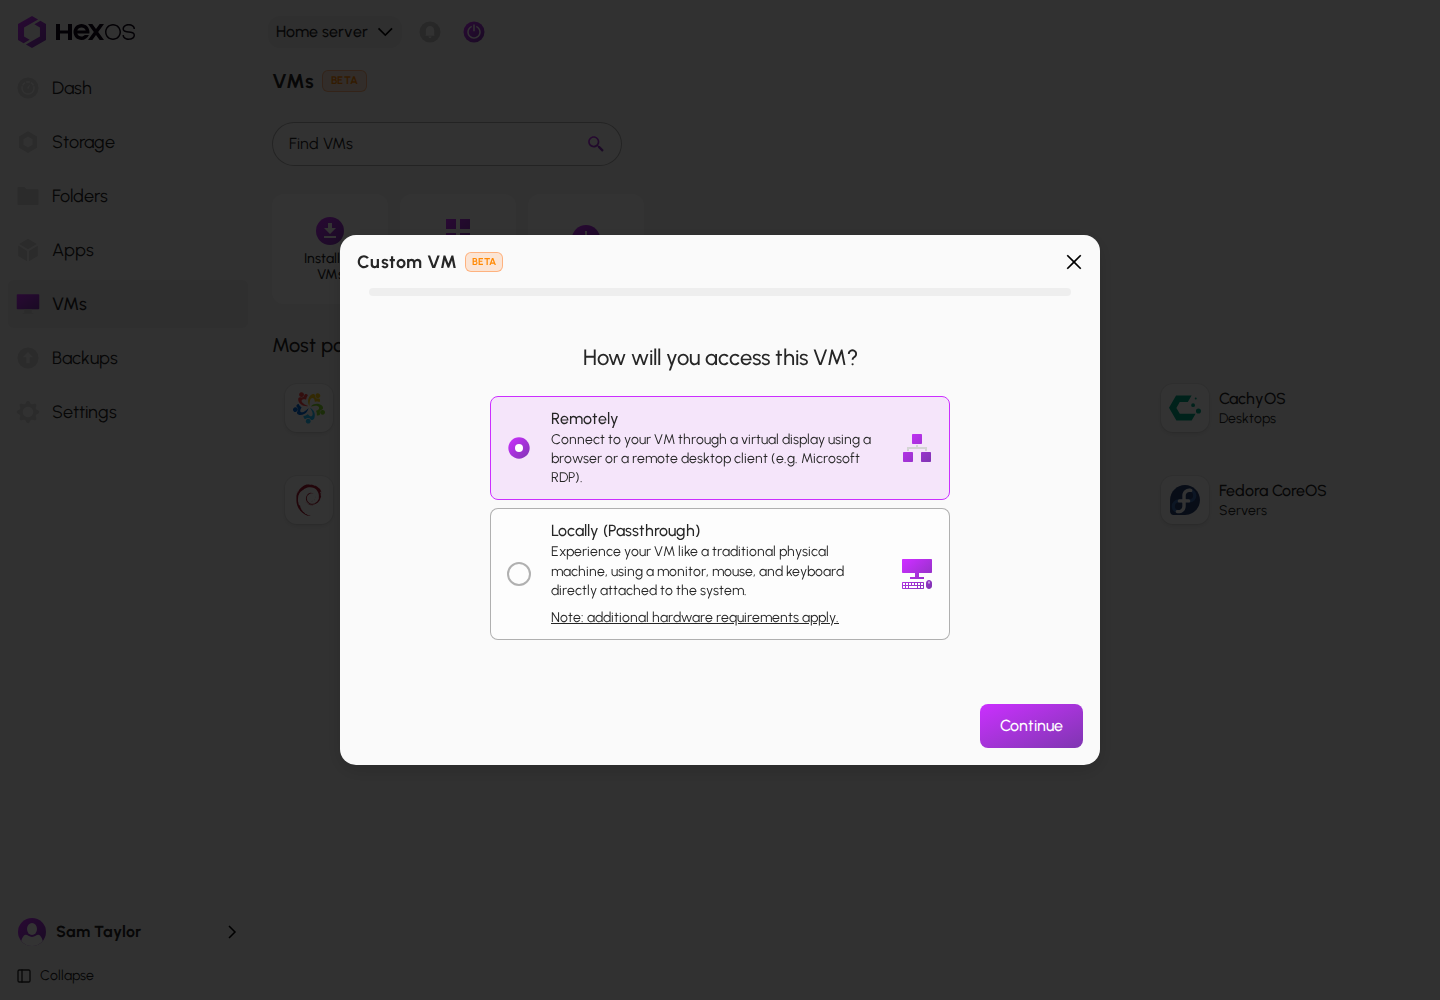
- How will you access this VM? Choose Remotely to use the VM through a virtual display in your browser or a Remote Desktop app. Choose Locally (Passthrough) to use a monitor, keyboard, and mouse plugged into your server. If no graphics card in your server can be handed to a VM, Locally (Passthrough) is grayed out and says why. See Passthrough requirements.
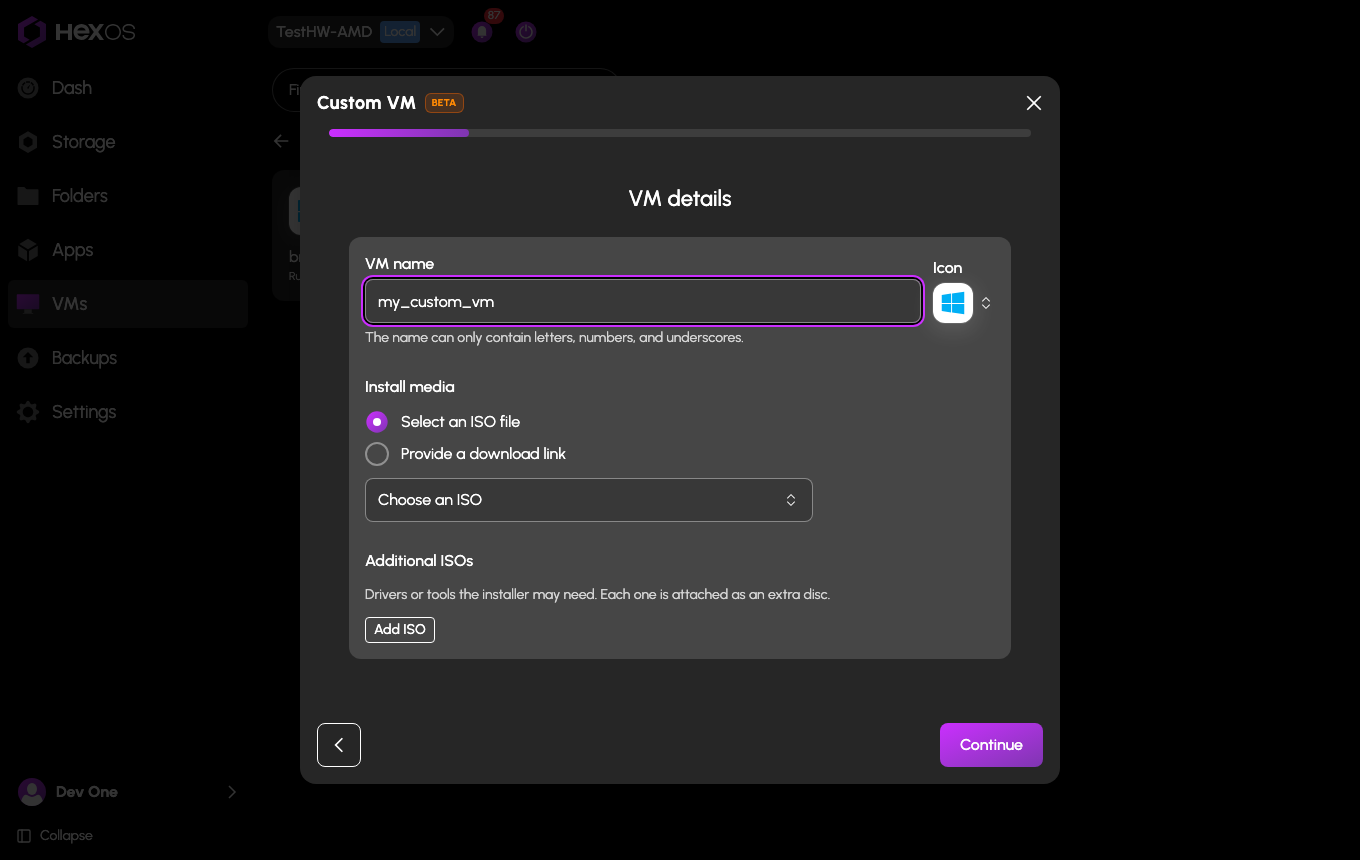
- VM details. Name the VM and choose an Icon. The icon also tells HexOS what kind of operating system this is. Under Install media, choose Select an ISO file, where Browse files… lets you upload one, or Provide a download link. Additional ISOs are for drivers or tools the installer may need, such as the Windows VirtIO drivers. You can add up to 4, and each one is attached as an extra disc.
- Device passthrough, only if you chose Locally (Passthrough): pick the graphics card, the USB controller, and sound.
- Continue through Storage, Resources, Peripherals, and Review as described above, then click Create VM.
Choosing how you will access the VM
VM details for a custom VM
A custom VM does not install the operating system for you. Once it starts, open its console and complete the installer yourself, as you would on a physical PC. The VM boots the installer while its disk is blank, and boots the disk once something is installed on it.
If you chose Provide a download link, HexOS first downloads the ISO. This shows in the activity center as Downloading image, Configuring the VM, and Starting the VM. The VM then appears under Installed VMs.
¶ While it is being set up
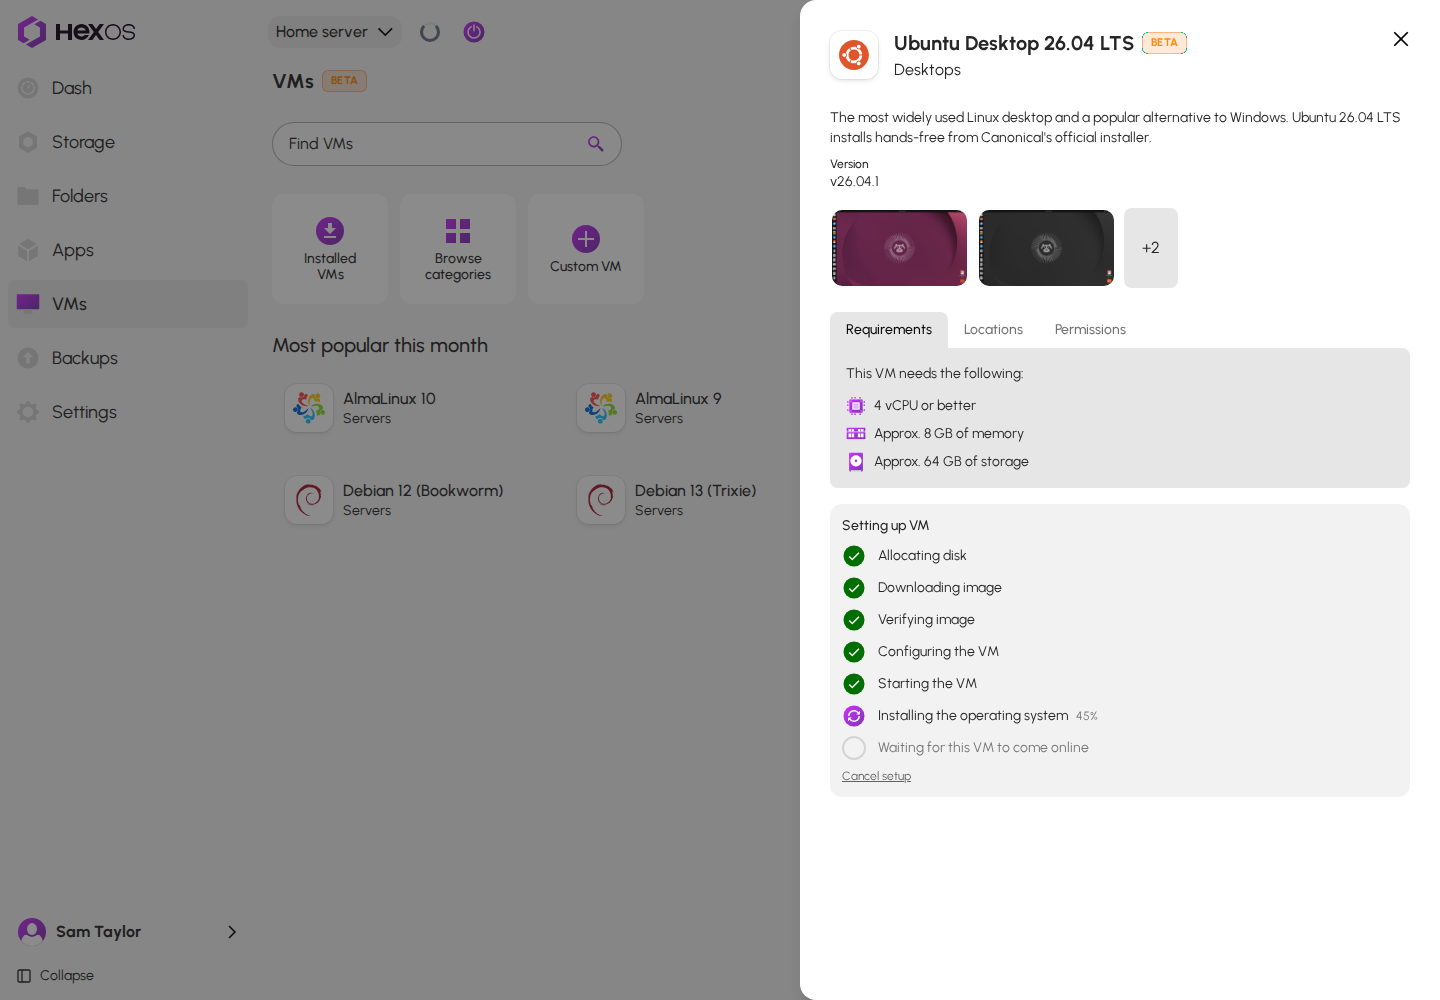
Setting up a VM takes a while, and Windows can take an hour or more. You can close the window and let it run. Progress appears in the activity center and on the system's page in the catalog, one step at a time. Depending on the system, the steps include Allocating disk, Downloading image, Verifying image, Writing disk image, Configuring the VM, Starting the VM, Installing the operating system (or Installing Windows), Waiting for this VM to come online, Installing apps, and Installing Windows updates. The VM's own page under Installed VMs also shows a live preview of its screen.
A VM being set up
When it is done, the activity center says Successfully set up VM. If it fails, HexOS says Failed to set up VM and the VM's name. Open the activity center for the reason.
While automated setup runs, the console and power controls are locked so a stray click cannot interrupt it, and the button reads Setting up. They unlock when setup completes. For Windows they unlock once setup reaches Installing Windows updates.
Windows setup starts by itself. In the rare case that it cannot, HexOS shows Action needed and asks you to open the VM's screen and press a key at the "Press any key to boot from CD or DVD" prompt.
Sometimes setup stops but keeps the VM and its disks. For example, when the system inside never reported that it was ready, HexOS says The VM and its disks were kept and explains why. Once the VM exists, HexOS never removes it or its disks by itself. If setup fails after that, HexOS keeps them and says so, for example Setup stopped. Your VM and disks were kept. You can open the VM to check it, or uninstall it and try again.
¶ Cancel setup
Cancel setup is on the system's page in the catalog while it installs. What it does depends on whether the VM exists yet:
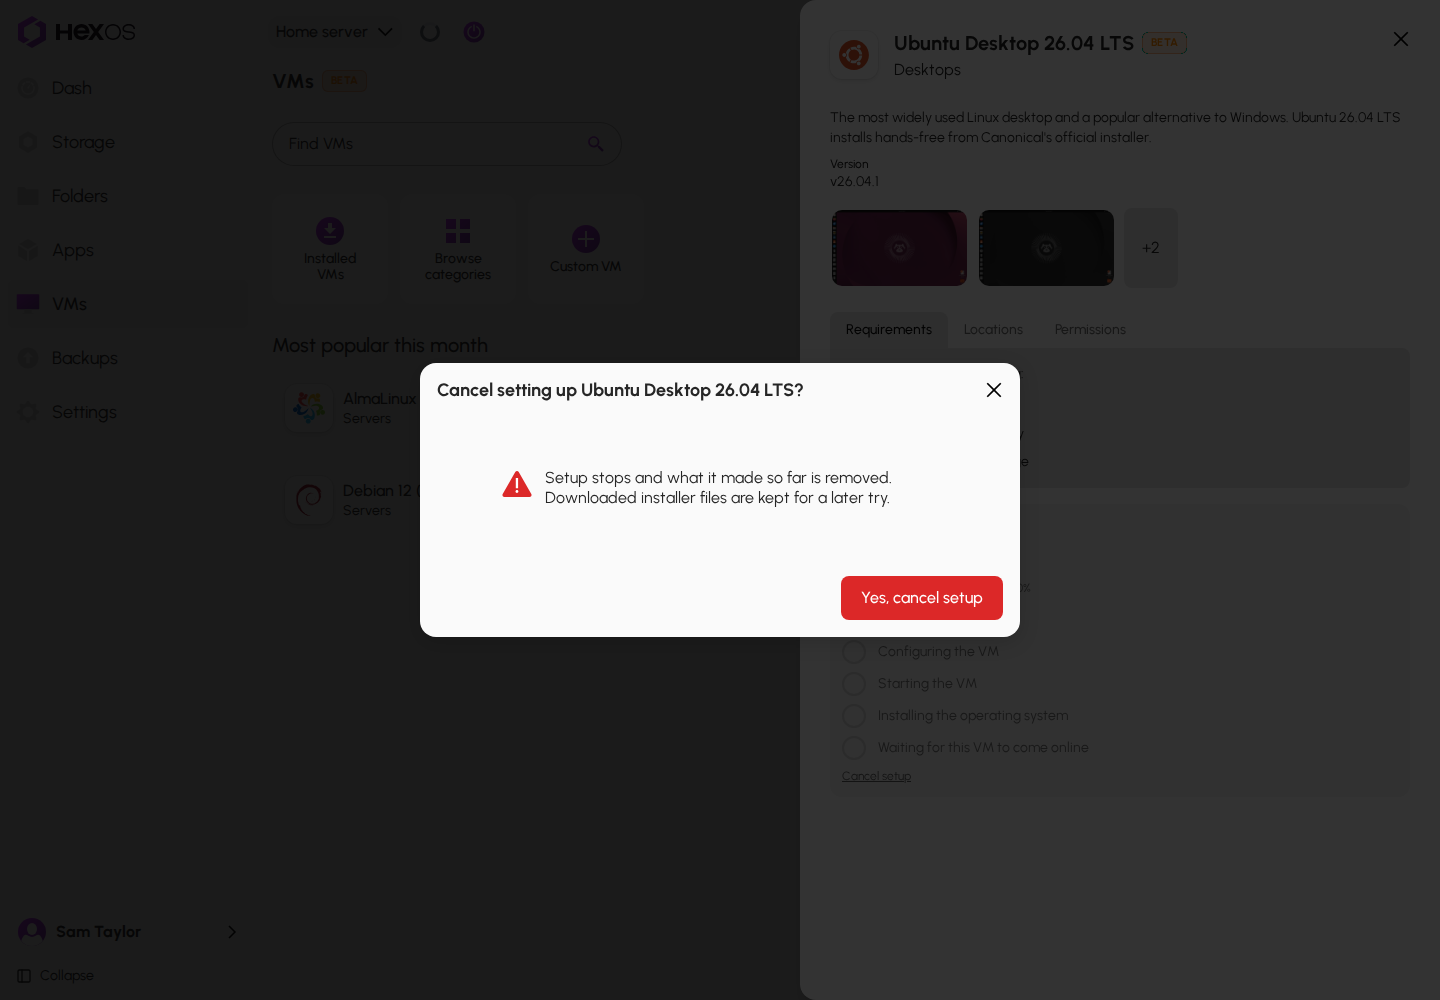
Before the VM exists, it asks once. Click Yes, cancel setup. Setup stops and what it made so far is removed. If HexOS made the VM while the dialog was open, it says The VM already exists, so cancelling setup removes it. Reload the page and confirm with the VM's name. Reload the page and click Cancel setup again.
Cancel setup before the VM exists
Once the VM exists, it removes the VM. The dialog lists the VM's disks the same way Uninstall does, and asks you to type the VM's name. Click Cancel setup and remove VM. Ticked disks are deleted for good, and unticked disks are kept. See Uninstall.
Cancel setup once the VM exists
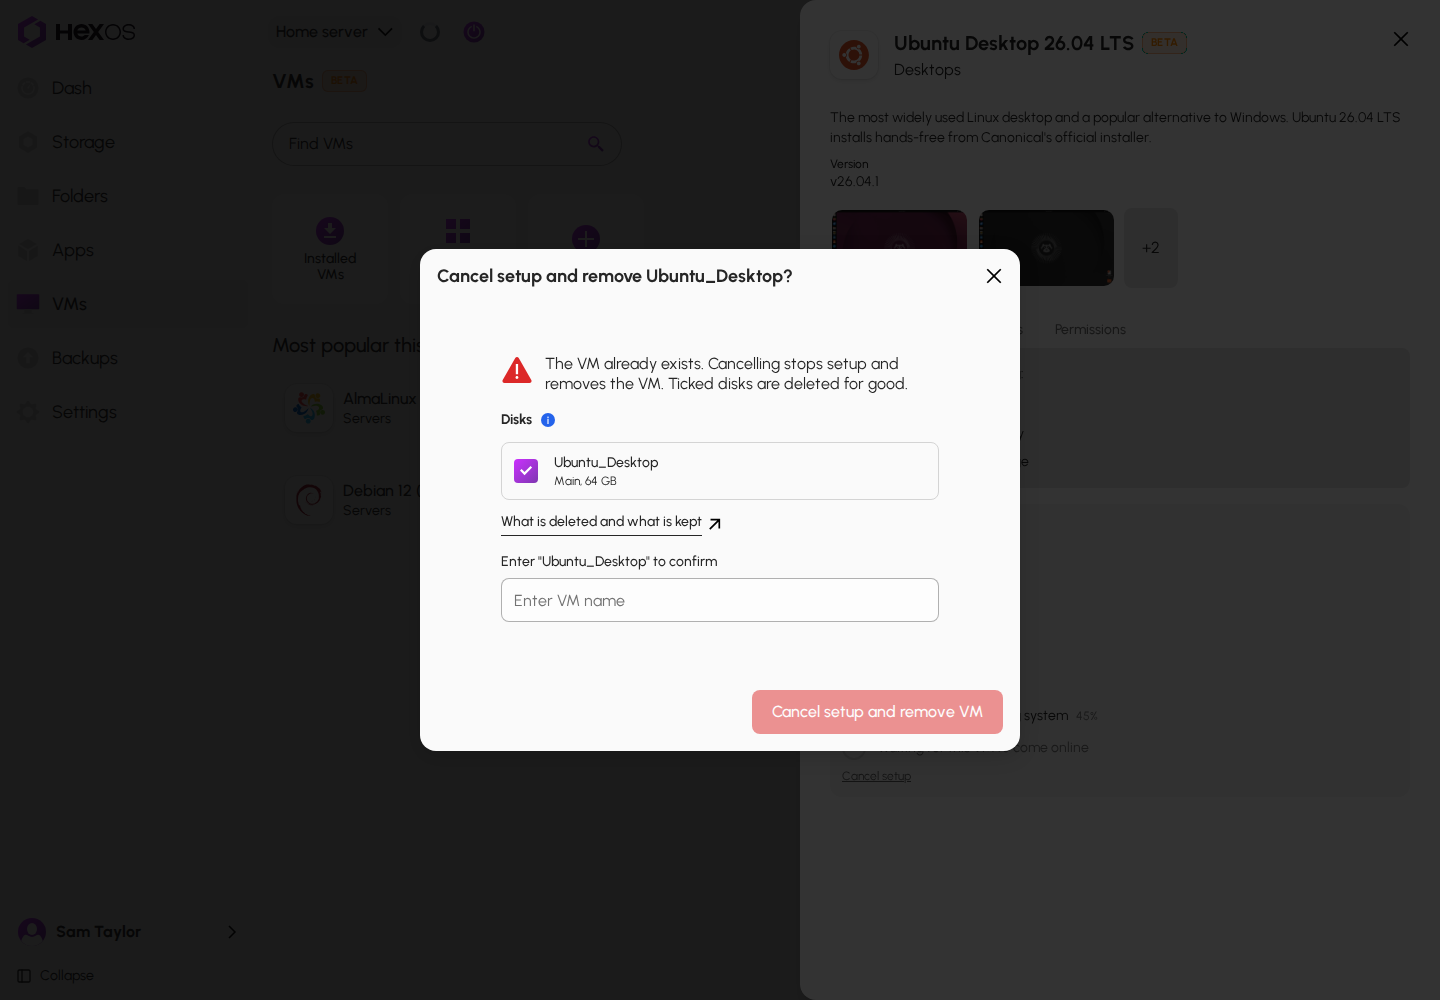
Either way, installer files HexOS downloaded are kept, so a second attempt is faster.
A custom VM started from a download link has no Cancel setup. Wait for it to finish or fail, then uninstall it.
¶ Using a VM
Go to VMs > Installed VMs and click a VM to open its details. VMs also show on the dashboard. To hide one there, turn off Show on dashboard on its Options tab.
The top of the details shows a Preview of the VM's screen while it runs, its Status, Operating System, Storage, and IP Address. A stopped VM shows its last known address. After you start a VM from HexOS, it can read Starting for a few minutes while its operating system comes up.
Installed VMs
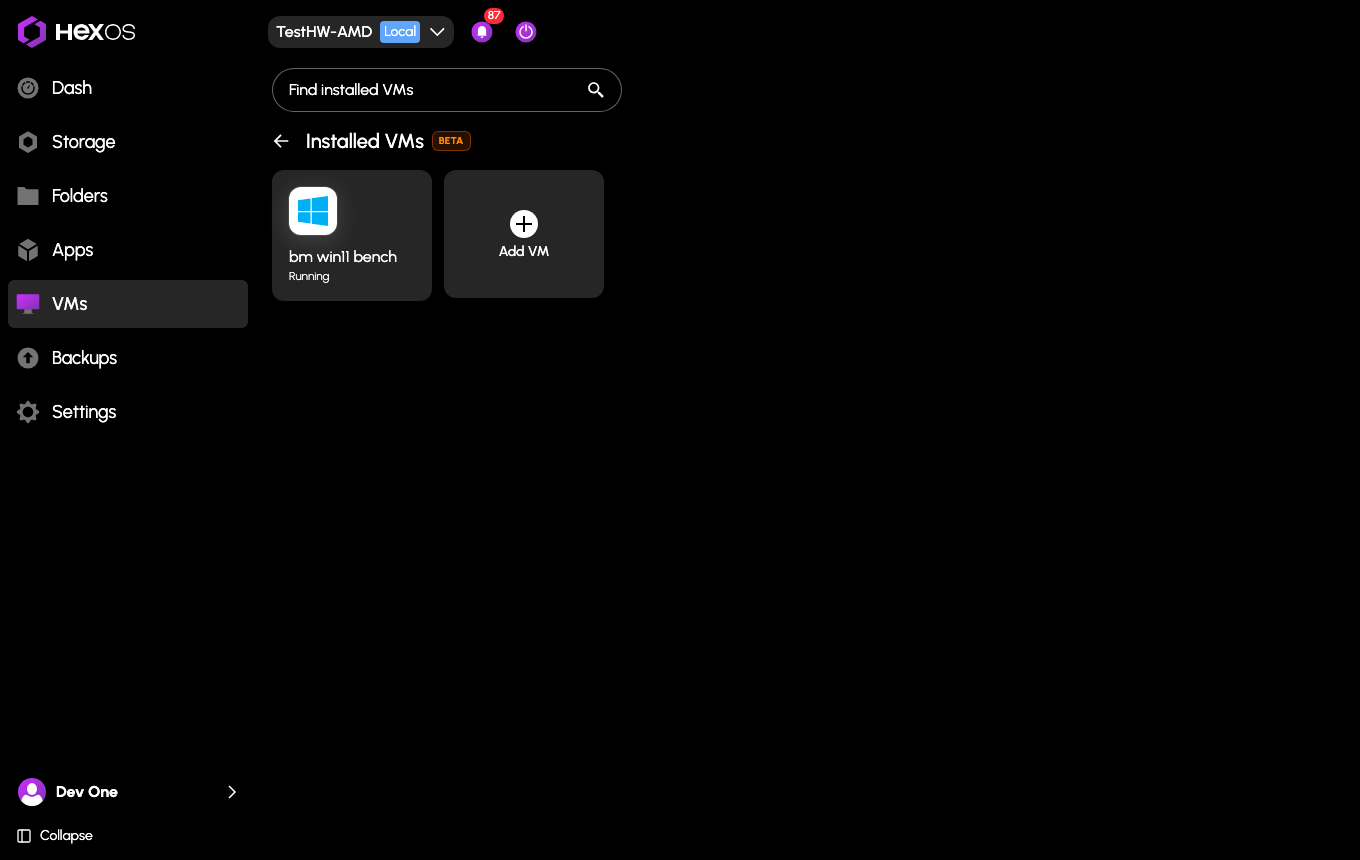
A VM's details
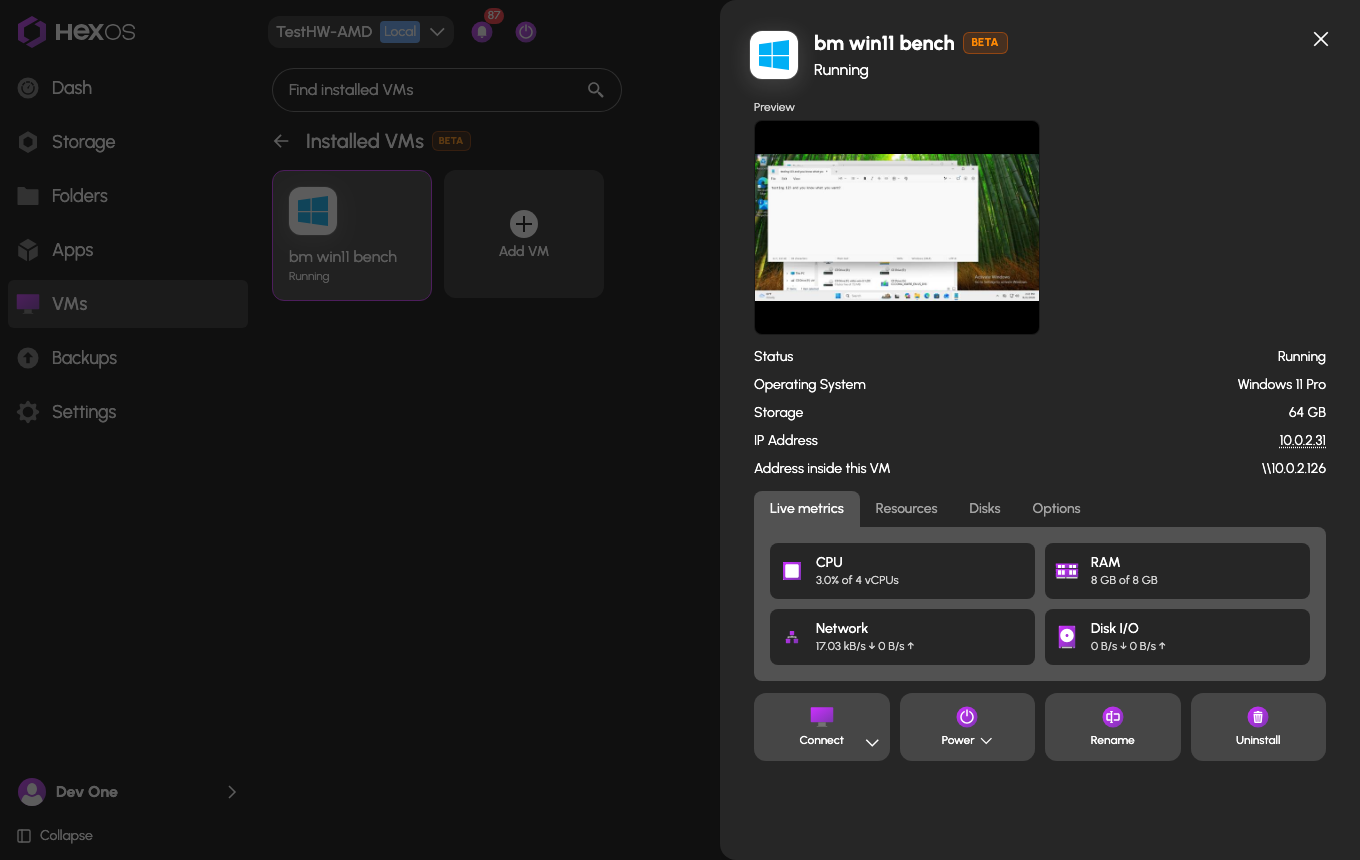
On some servers, your server's usual address does not work from inside its own VMs. On those servers each VM also shows Address inside this VM. Use that address from inside the VM to reach your server's shared folders and apps. From any other device, use the server's usual address.
¶ Connecting
Click Connect to open the VM. When there is more than one way to open it, the arrow beside Connect lists them. The check mark on each row makes it the default:
- Console opens the VM's screen in a new browser tab. It works while the VM is starting, while you install an operating system, and when the VM has no network.
- Remote Desktop, for Windows VMs that are running, downloads a file that opens the VM in a Remote Desktop app. This is smoother for everyday use. The file never contains your password. On a Mac, iPhone, iPad, or Android device, Get the Windows App links to Microsoft's app.
- Web UI, for appliances that have their own web page, such as Home Assistant OS and Plex Media Server. For these VMs, Console is only offered with Expert Mode on.
Clicking the IP Address of a running Windows VM also downloads a Remote Desktop file.
Ways to connect
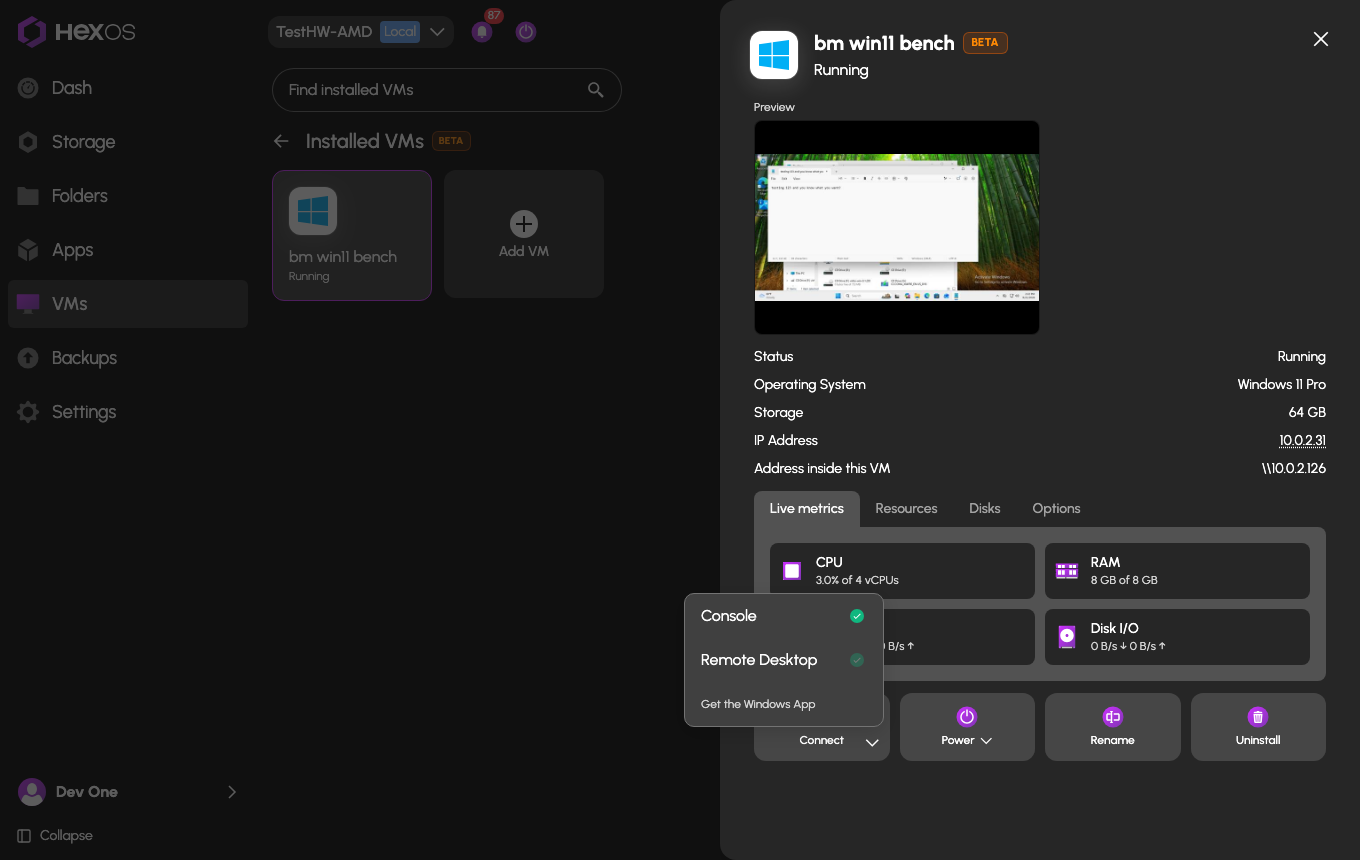
Info: The console and Web UI run on your server, so opening them needs a connection from your own network.
¶ The console
The console has a bar across the top:
- Paste Text types a block of text, such as a password, into the VM.
- Ctrl+Alt+Del and Ctrl+Shift+Esc send those key combinations. Ctrl+Shift+Esc opens Task Manager in Windows.
- Fullscreen hides the browser's own bars.
- The power button has Shut Down, Restart, and Force Power Off. Each one asks you to confirm.
- The ⋯ menu has Copy Files to VM… and Slow Network Mode.
Sound from the VM plays through the console.
The console bar and its menu
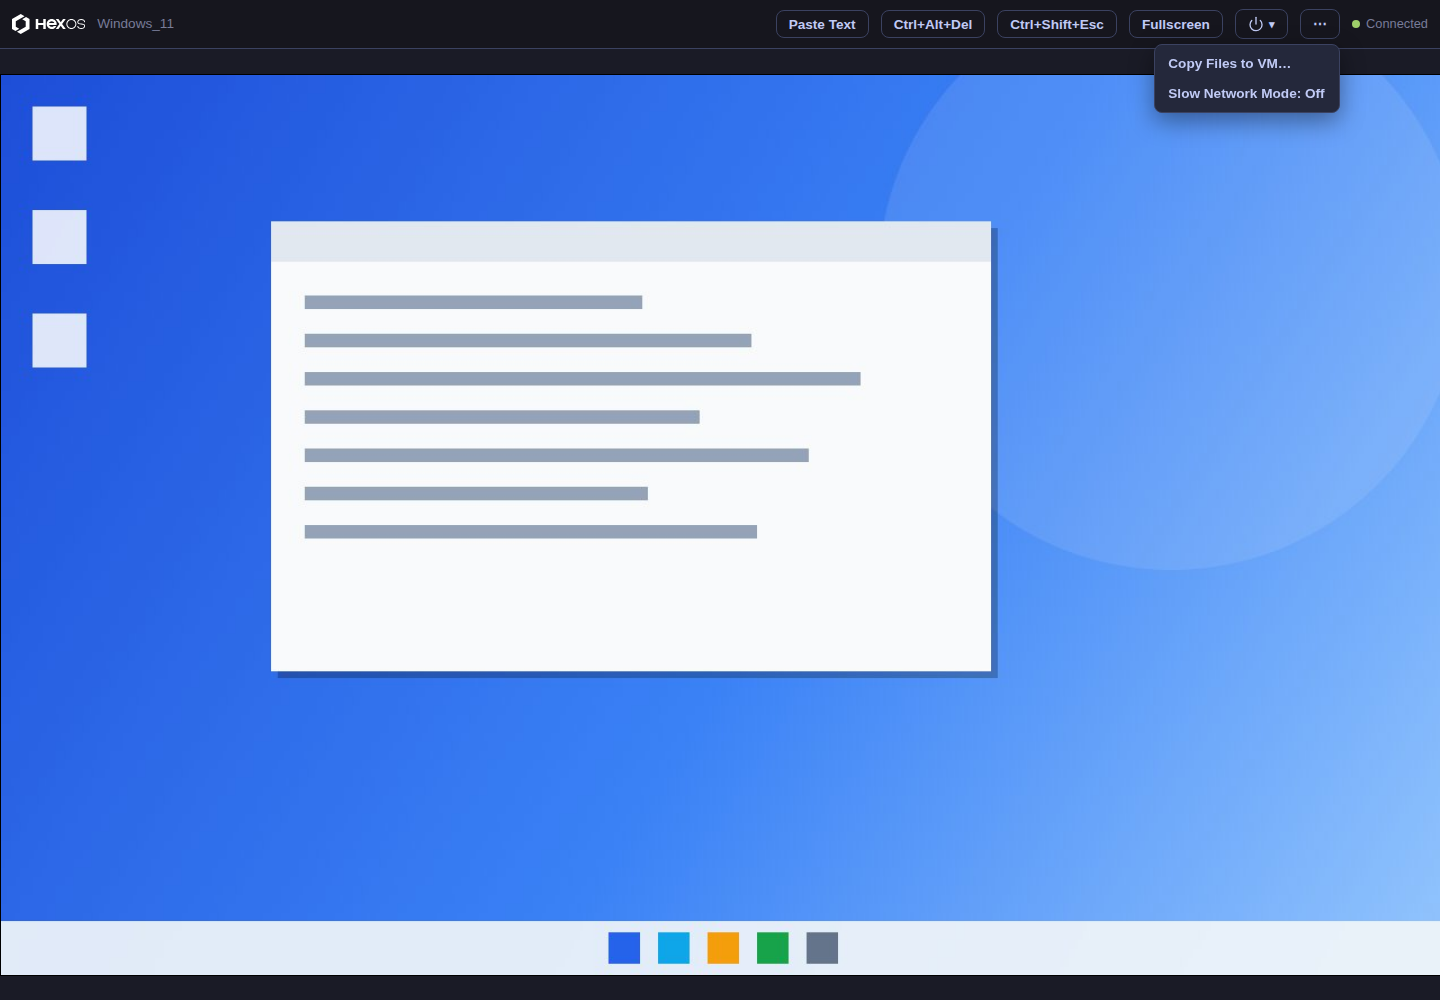
Copy Files to VM…, or dragging files onto the console, copies files from your computer into the VM. Windows saves them on the Desktop, and Linux in the Downloads folder. A folder arrives as a .zip file. This needs the SPICE guest agent inside the VM. On Windows, install the VirtIO guest tools. On Linux, install spice-vdagent and sign in to the desktop.
Slow Network Mode sends fewer, smaller screen updates, for a slow or distant connection.
Only one browser can use a VM's console at a time. If you open it somewhere else, the first one shows Another Active Session Detected and a Use Here button to take it back. If the VM is off, the console says Virtual Machine Stopped with a Start VM button. If it says Console Session Expired, close the tab and open the console from HexOS again.
You can also use the console from a phone or tablet, with touch gestures, your device's keyboard, and a row of extra keys. See Using a VM's console from a phone or tablet.
¶ Live metrics
The Live metrics tab shows CPU, RAM, Network, and Disk I/O while the VM is running.
¶ Changing a VM
¶ Processor cores and memory
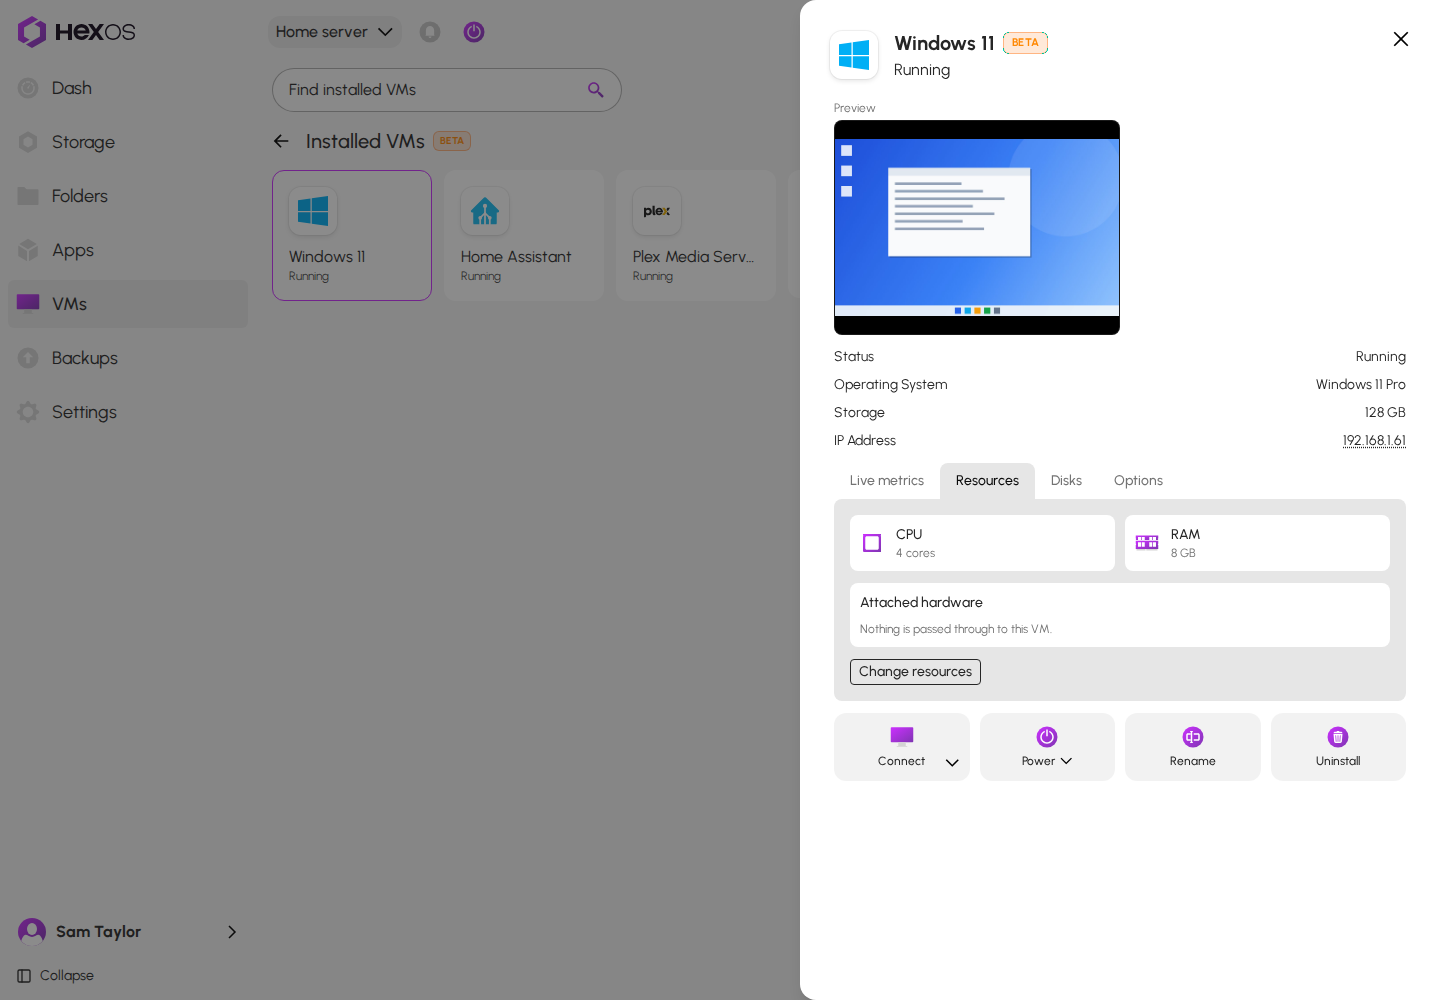
- Open the VM's details and click the Resources tab.
- Click Change resources.
- Move the sliders and click Save changes.
You can save while the VM is running. The changes take effect the next time it starts.
The Attached hardware card on the same tab lists any graphics card, USB controller, or other device handed to this VM.
The Resources tab
Change resources
¶ Disks
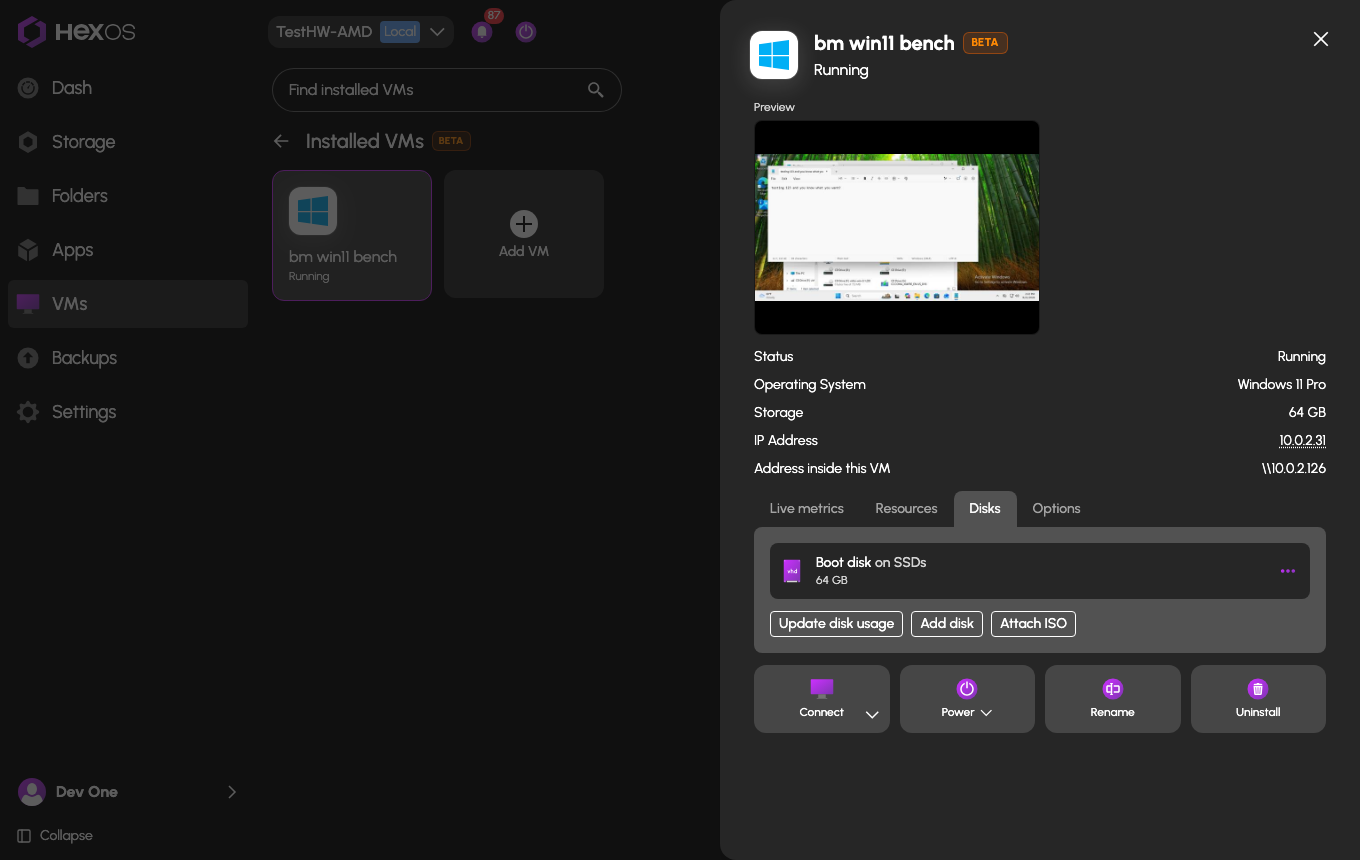
The Disks tab lists the VM's disks and their size. Click Update disk usage to see how full each one is.
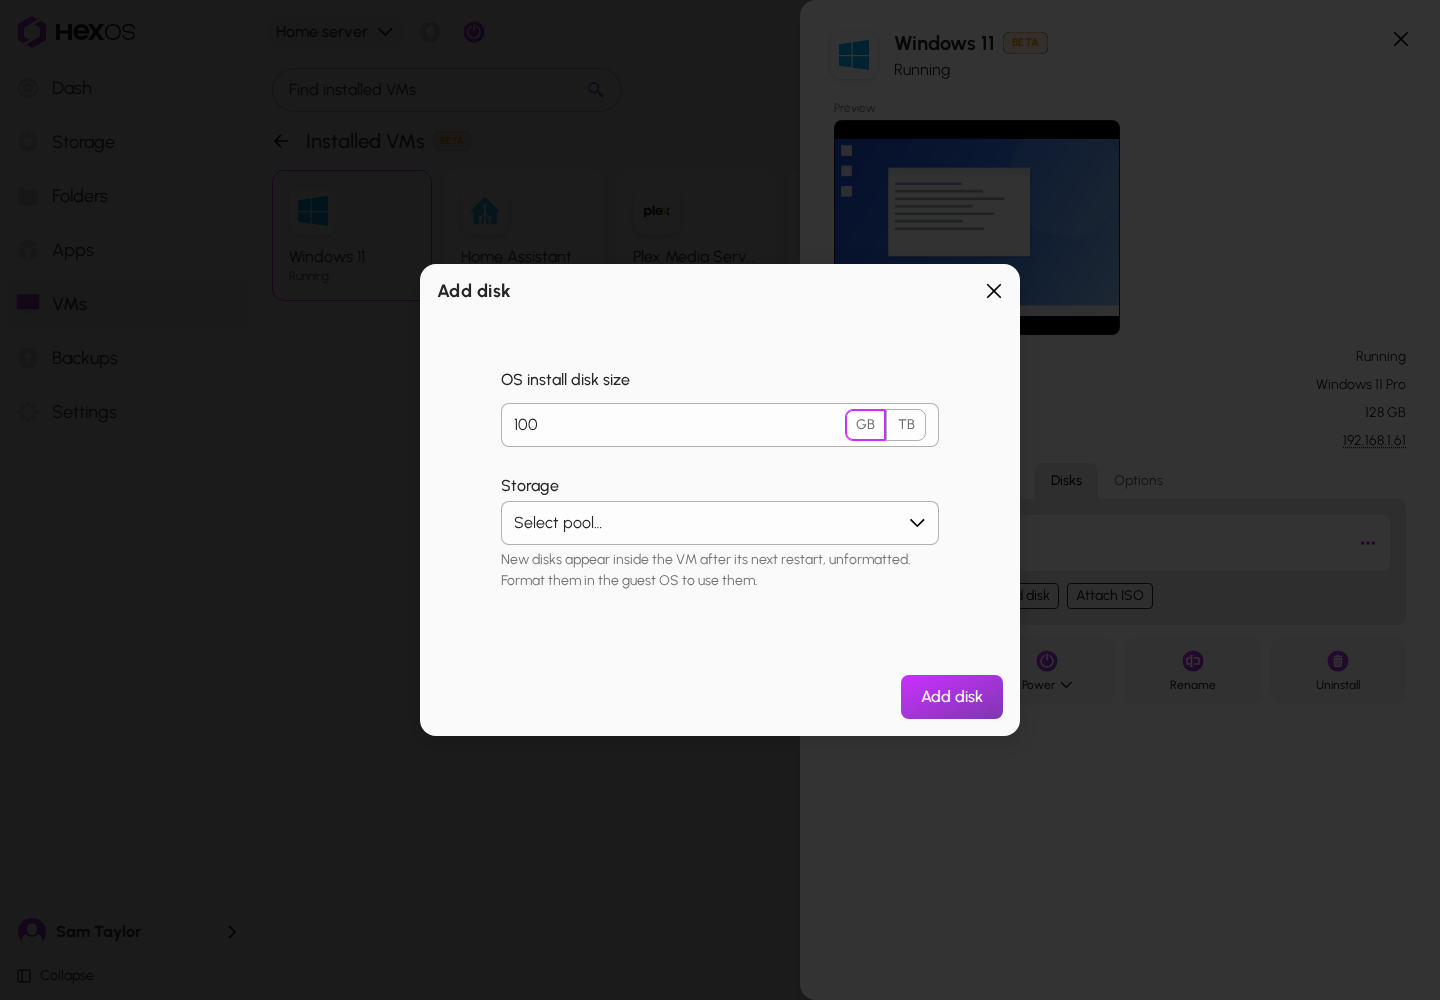
- Add disk creates another virtual disk. Choose its size, and a pool under Storage if you want it somewhere other than your Virtual Disks pool. It appears inside the VM after its next restart, unformatted, so format it from the VM's operating system before using it. A VM can have up to 8 disks.
- Resize, in a disk's menu, makes it larger. A disk can never be made smaller, because that would destroy data inside the VM. The extra space appears inside the VM as unallocated, and the VM's operating system has to extend its own partition to use it.
Update disk usage and Detect from VM need the VM to be running with its guest agent. The systems in the catalog install the guest agent for you.
The Disks tab
Add disk
¶ Discs (ISOs)
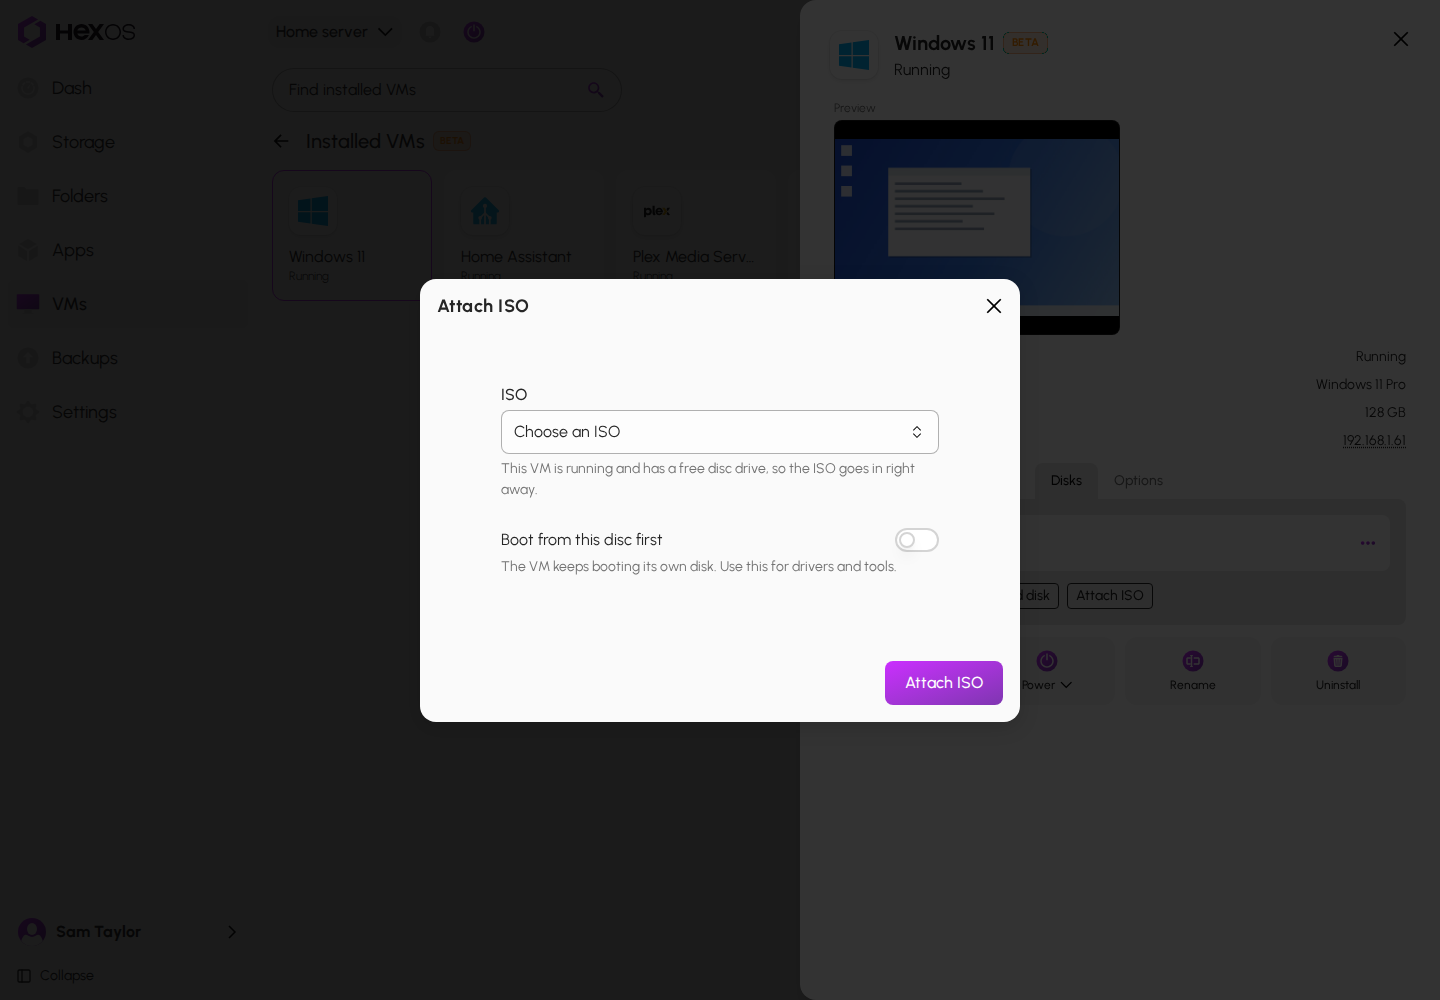
A VM has a disc drive, like the DVD drive of a physical PC. To put an ISO in it:
- On the Disks tab, click Attach ISO.
- Choose an ISO from your Install Media folder.
- Leave Boot from this disc first off for drivers and tools. Turn it on to reinstall the operating system or to run a rescue disc. The VM then boots that disc on every start until you remove it.
- Click Attach ISO.
If the VM is running and has a free disc drive, the ISO goes in right away. Otherwise the VM sees it after its next restart. A VM can have up to 5 ISOs attached. An older VM, or one made in TrueNAS, may have no disc drive yet. Attaching an ISO adds one, and a running VM sees it after its next restart.
To take one out, open the ISO's menu on the Disks tab and click Eject for a running VM or Remove for a stopped one. An ejected ISO reads Ejected. Goes away at the next start. until the VM starts again. Only the VM's disc drive changes. The ISO file is never deleted.
Attach ISO
Info: VMs can only boot ISOs stored directly in your Install Media folder. See Install media for VMs.
¶ Options
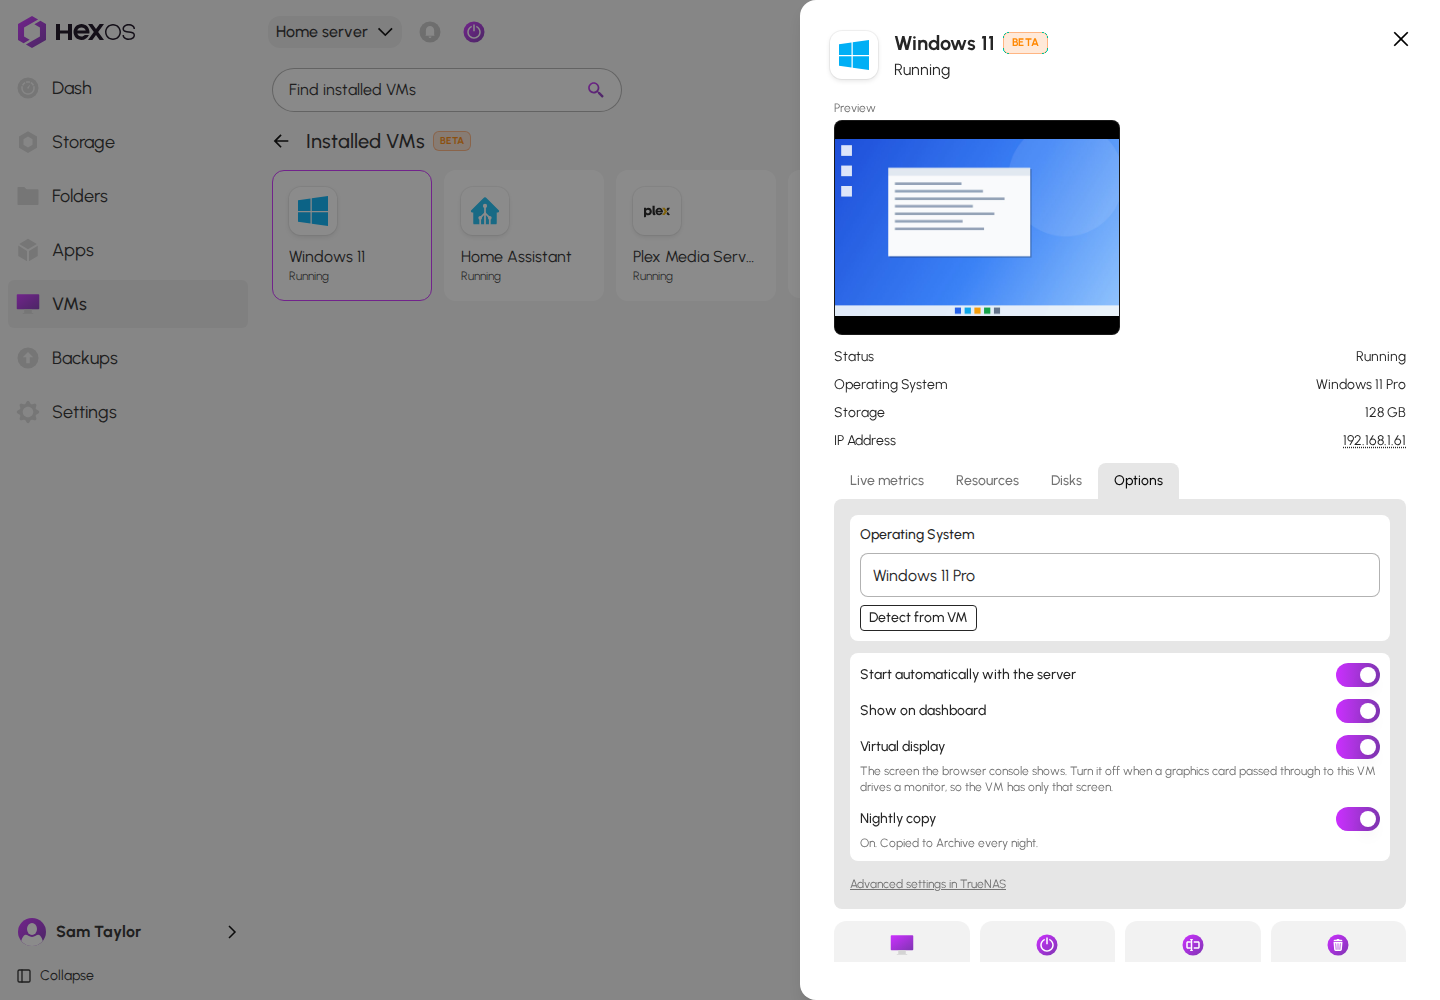
The Options tab has:
- Operating System: what HexOS shows for this VM. Detect from VM reads it from a running VM. Click Save changes after you change it.
- Start automatically with the server
- Show on dashboard
- Virtual display: the screen the browser console shows. Turn it off when a graphics card handed to this VM drives a monitor, so the VM has only that screen. It comes off the next time you stop or start the VM from HexOS. With the virtual display off, Console is not offered.
- Nightly copy: where HexOS offers it, whether HexOS copies this VM's disk to another pool every night. See App backups.
- Advanced settings in TrueNAS, shown with Expert Mode on, for anything HexOS does not offer
The Options tab
¶ Start, stop, rename and remove
| Action | What it does |
|---|---|
| Power on | Starts a stopped VM |
| Power > Reboot | Asks the operating system to shut down, then starts the VM again |
| Power > Shut down | Asks the operating system to shut down normally |
| Power > Force off | Cuts power immediately, like holding the power button. Anything unsaved inside the VM is lost |
| Rename | Changes the name the VM is shown under. Stop the VM first |
| Run setup | Runs VM setup again, for systems that have it |
| Uninstall | Removes the VM. Deletes only the disks you tick |
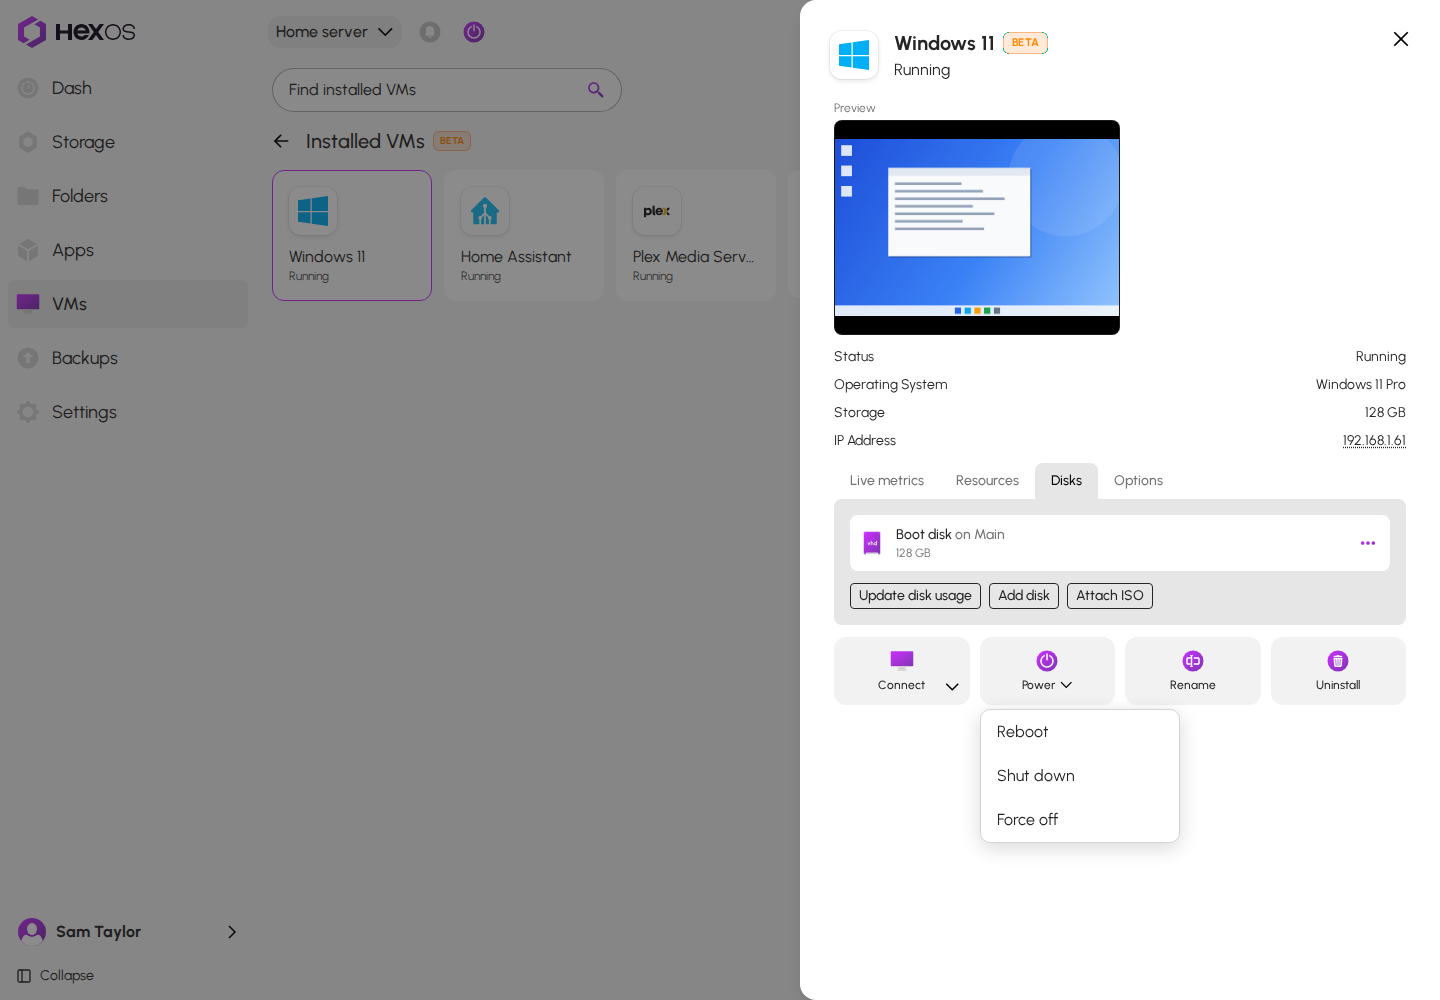
A running VM shows the Power menu. A stopped VM shows Power on instead.
Warning: Reboot, Shut down and Force off act as soon as you click them, with no question first. If the operating system has not shut down in time, Shut down and Reboot turn the VM off anyway. Save your work inside the VM first. The power button in the console asks before each action.
The Power menu
If Rename says Old TPM data for this name is still on the server, choose a different name.
¶ Uninstall
To uninstall a VM, click Uninstall. The Uninstall VM dialog lists the VM's disks under Disks:
- Disks HexOS made for this VM start ticked.
- A disk HexOS did not make for this VM starts unticked. It says Not made by HexOS for this VM. Tick it only if you want it gone. This covers the disks of VMs made in TrueNAS, a disk you attached yourself, and the disks of a VM set up with an earlier version of HexOS.
- Some disks cannot be ticked and are always kept. Each one says why: another VM uses it, a share or another service uses it, another disk was copied from it or it is protected, or HexOS could not check it.
- A disk that is a file is listed as File disk, kept.
Tick the disks you want deleted, type the VM's name, and click Remove this VM. HexOS shuts the VM down, removes it, and deletes each ticked disk with its snapshots. Unticked disks are kept.
Uninstall VM
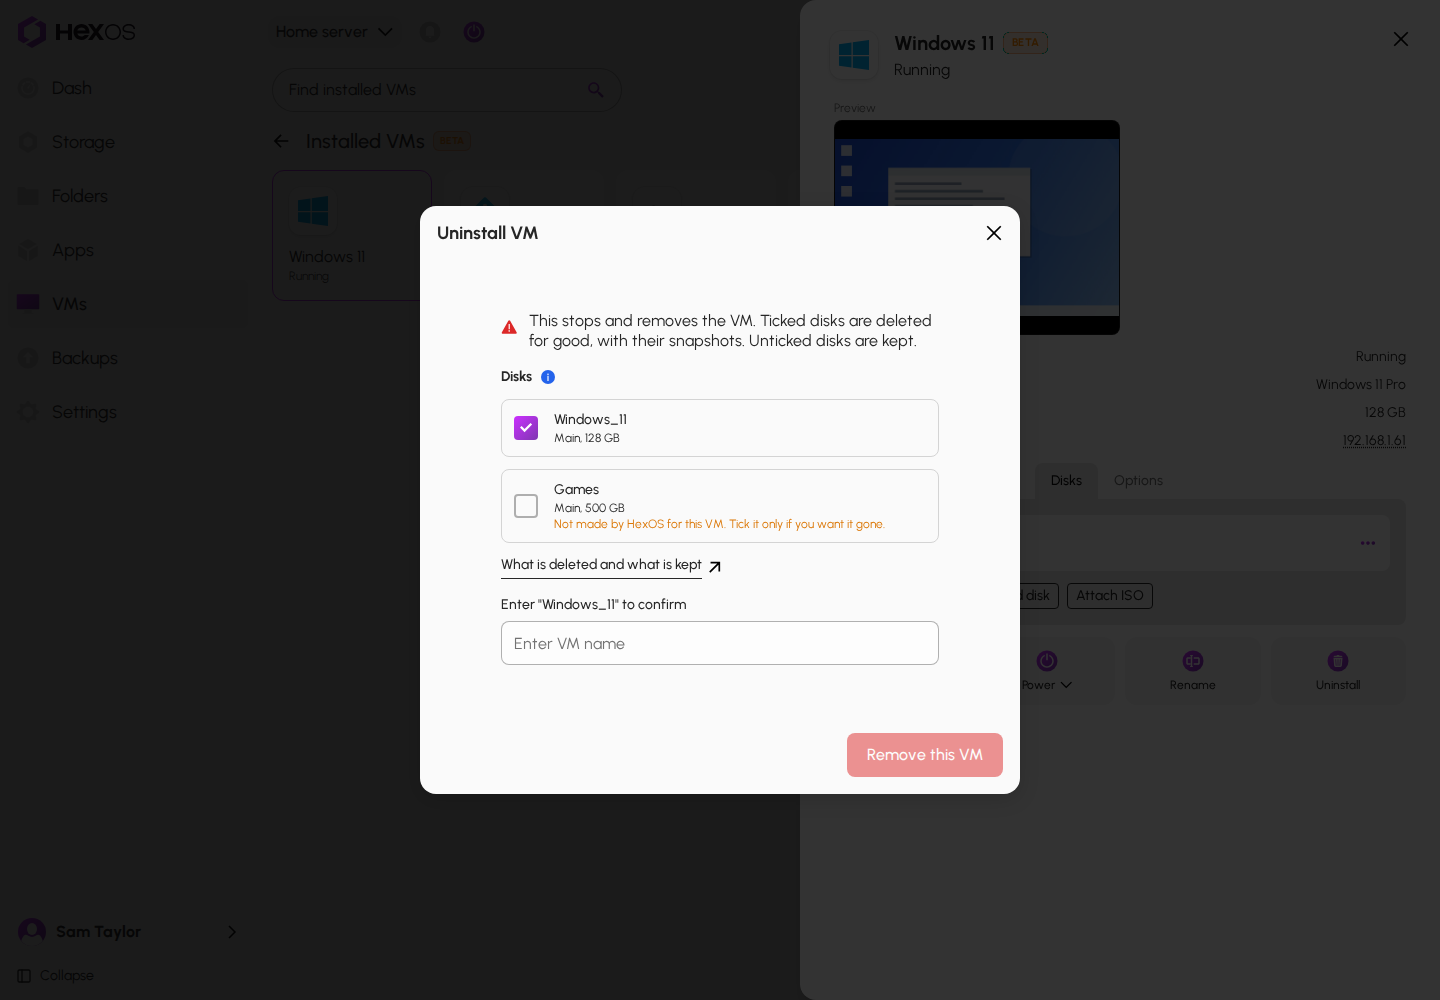
Danger: Ticked disks are deleted for good, with their snapshots. This cannot be undone. Check every tick before you click Remove this VM.
HexOS checks each ticked disk again just before it deletes it. If another VM or a share started using the disk meanwhile, or another disk was copied from it, the disk is kept and HexOS says VM removed. Some disks you ticked were kept.
HexOS asks the VM to shut down and never forces it off. If the VM does not shut down, nothing is removed and HexOS says The VM did not shut down, so nothing was removed. Turn it off, then try again. Click Power > Force off, then click Uninstall again.
Uninstall also removes the setup files HexOS made for the VM, its Windows security data, and the account a system such as Plex Media Server uses to read your folders. Your own ISO files, and the installer files HexOS downloaded, are kept.
¶ VMs made in TrueNAS
VMs you made in the TrueNAS web interface also show under Installed VMs. You can start, stop, and open them from HexOS like any other VM.
Info: Uninstall lists the disks of a VM made in TrueNAS with none of them ticked, because HexOS did not make them. A disk you leave unticked is kept, so a disk you attached from an earlier server or a replication stays on your pool.
¶ Storage and snapshots
VM disks are thin-provisioned: the size you choose is a limit, and the disk only takes up space as it fills. Making a disk bigger later is easy and making it smaller is not possible, so there is no need to over-allocate.
VMs use two locations under Settings > Locations > Virtualization: Virtual Disks for VM disks, and Install Media for ISOs. When you place a disk on a different pool, during setup or with Add disk, HexOS creates a Virtual Disks folder on that pool.
Info: A location cannot be changed while VMs are using it. Uninstall those VMs first.
HexOS has no snapshot choice or snapshot screen right now:
- Systems set up from the catalog get one snapshot of the fresh install.
- VMs set up with Automatic snapshots before the choice was removed still get a snapshot every day, each kept for a week. A disk you add later joins the same schedule.
- To take or restore a snapshot, use TrueNAS.
¶ When your server is offline
Your VMs keep running when your server cannot reach HexOS. The server's own Command Deck, the one you open at home, keeps showing VMs using the last check it got from HexOS. That check lasts 30 days.
If your server has not reached HexOS in the last 30 days, or has not reached it since Virtual Machines opened to everyone, its own deck hides VMs until it reconnects. Connect the server to the internet once and VMs come back.
¶ Where to go next
| I want to… | Guide |
|---|---|
| Add an ISO or find my Install Media folder | Install media for VMs |
| Hand a graphics card or USB devices to a VM | Passthrough requirements |
| Let HexOS finish setting up Plex or Home Assistant | VM setup |
| Run Plex Media Server as a VM | Plex Media Server VM |
| Use a VM's screen from my phone | Using a VM's console from a phone or tablet |
| Keep a nightly copy of a VM | App backups |
| Bring VMs back after the apps drive fails | When the apps drive fails |